How To’s

How To: curl the Openstack API’s (v3 Keystone Auth)

While Openstack provides a python client(s) for interactions….

[root@diamond ~]# source keystonerc_tuxninja
[root@diamond ~(keystone_tuxninja)]# openstack server list
+--------------------------------------+-------+--------+----------------------------------------+
| ID                                   | Name  | Status | Networks                               |
+--------------------------------------+-------+--------+----------------------------------------+
| e5b35d6a-a9ba-4714-a9e1-6361706bd047 | spin1 | ACTIVE | private_tuxlabs=10.0.0.8, 192.168.1.52 |
+--------------------------------------+-------+--------+----------------------------------------+
[root@diamond ~(keystone_tuxninja)]#

I frequently, finding myself needing to get data out of it without the pain of awk/sed’ing out the ASCII art.

Thus to quickly access the raw data, we can directly query the API’s using curl & parsing JSON instead, which is much better 🙂

Authentication

Before we can interact with the other Openstack API’s we need to authenticate to Keystone openstack’s identity service. After authenticating we receive a token to use with our subequent API requests. So step 1 we are going to create a JSON object with the required authentication details.

Create a file called ‘token-request.json’ with an object that looks like this.

{
    "auth": {
        "identity": {
            "methods": [
                "password"
            ],
            "password": {
                "user": {
                    "domain": {
                        "id": "default"
                    },
                    "name": "tuxninja",
                    "password": "put_your_openstack_pass"
                }
            }
        }
    }
}

Btw, if you followed my tutorial on how to install Openstack Kilo, your authentication details for ‘admin’ is in your keystonerc_admin file.

Now we can use this file to authenticate like so:

export TOKEN=`curl -si -d @token-request.json -H "Content-type: application/json" http://localhost:35357/v3/auth/tokens | awk '/X-Subject-Token/ {print $2}'`

The token is actually returned in the header of the HTTP response, so this is why we need ‘-i’ when curling. Notice we are parsing out the token and returning the value to an environment variable $TOKEN.

Now we can include this $TOKEN and run whatever API commands we want (assuming admin privileges for the tenant/project)

Curl Commands (Numerous Examples!)

# list domains
curl -si -H"X-Auth-Token:$TOKEN" -H "Content-type: application/json" http://localhost:35357/v3/domains

# create a domain
curl  -H"X-Auth-Token:$TOKEN" -H "Content-type: application/json" -d '{"domain": {"description": "--optional--", "enabled": true, "name": "dom1"}}'  http://localhost:35357/v3/domains


# list users
curl -si -H"X-Auth-Token:$TOKEN" -H "Content-type: application/json" http://localhost:35357/v3/users

# To create a users, create file named create_user.json file like this:

{
    "user": {
           "default_project_id": "18ed894bb8b84a5b9144c129fc754722",
            "description": "Description",
            "domain_id": "default",
            "email": "tuxninja@tuxlabs.com",
            "enabled": true,
            "name": "tuxninja",
            "password": "changeme" }
}

# then run
curl -si -H"X-Auth-Token:$TOKEN" -H "Content-type: application/json" http://localhost:35357/v3/users -d @create_user.json


# list images in nova
                                                                                             <tenant_id>
curl -s -H"X-Auth-Token:$TOKEN" -H "Content-type: application/json" http://localhost:8774/v2/18ed894bb8b84a5b9144c129fc754722/images | python -m json.tool

# list servers (vms)

curl -s -H"X-Auth-Token:$TOKEN" -H "Content-type: application/json" http://localhost:8774/v2/18ed894bb8b84a5b9144c129fc754722/servers | python -m json.tool

# neutron networks

curl -s -H"X-Auth-Token:$TOKEN" -H "Content-type: application/json" http://localhost:9696/v2.0/networks | python -m json.tool

# neutron subnets

curl -s -H"X-Auth-Token:$TOKEN" -H "Content-type: application/json" http://localhost:9696/v2.0/networks | python -m json.tool

I sometimes pipe the output to python -m json.tool, which provides formatting for JSON. Lets take a closer look at an example.

Listing servers (vm’s)

[root@diamond ~(keystone_tuxninja)]# curl -s -H"X-Auth-Token:$TOKEN" -H "Content-type: application/json" http://localhost:8774/v2/18ed894bb8b84a5b9144c129fc754722/servers | python -m json.tool
{
    "servers": [
        {
            "id": "e5b35d6a-a9ba-4714-a9e1-6361706bd047",
            "links": [
                {
                    "href": "http://localhost:8774/v2/18ed894bb8b84a5b9144c129fc754722/servers/e5b35d6a-a9ba-4714-a9e1-6361706bd047",
                    "rel": "self"
                },
                {
                    "href": "http://localhost:8774/18ed894bb8b84a5b9144c129fc754722/servers/e5b35d6a-a9ba-4714-a9e1-6361706bd047",
                    "rel": "bookmark"
                }
            ],
            "name": "spin1"
        }
    ]
}
[root@diamond ~(keystone_tuxninja)]#

I only have 1 VM currently called spin1, but for the tutorials sake, if I had ten’s or hundred’s of VM’s and all I cared about was the VM name or ID, I would still need to parse this JSON object to avoid getting all this other meta-data.

My favorite command line way to do that without going full Python is using the handy JQ tool.

Here is how to use it !

[root@diamond ~(keystone_tuxninja)]# curl -s -H"X-Auth-Token:$TOKEN" -H "Content-type: application/json" http://localhost:8774/v2/18ed894bb8b84a5b9144c129fc754722/servers | jq .
{
  "servers": [
    {
      "name": "spin1",
      "links": [
        {
          "rel": "self",
          "href": "http://localhost:8774/v2/18ed894bb8b84a5b9144c129fc754722/servers/e5b35d6a-a9ba-4714-a9e1-6361706bd047"
        },
        {
          "rel": "bookmark",
          "href": "http://localhost:8774/18ed894bb8b84a5b9144c129fc754722/servers/e5b35d6a-a9ba-4714-a9e1-6361706bd047"
        }
      ],
      "id": "e5b35d6a-a9ba-4714-a9e1-6361706bd047"
    }
  ]
}
[root@diamond ~(keystone_tuxninja)]#
[root@diamond ~(keystone_tuxninja)]# curl -s -H"X-Auth-Token:$TOKEN" -H "Content-type: application/json" http://localhost:8774/v2/18ed894bb8b84a5b9144c129fc754722/servers | jq .servers[0].name -r
spin1
[root@diamond ~(keystone_tuxninja)]#

The first command just takes whatever the STDOUT from curl is and indent’s and color’s the JSON making it pretty (colors gives it +1 vs. python -m json.tool).

The second example we actually parse what were after. As you can see it is pretty simple, but jq’s query language may not be 100% intuitive at first, but I promise it is pretty easy to understand if you have ever parsed JSON before. Read up more on JQ @ https://stedolan.github.io/jq/ & check out the Openstack docs for more API commands http://developer.openstack.org/api-ref.html

Hope you enjoyed this post ! Until next time.


How To: curl the Openstack API’s (v3 Keystone Auth) Read More »

Installing Openstack Kilo on Centos 7

openstack-kilo-logo
In a previous article I wrote about how to install Openstack Icehouse on CentOS 6.5 in great detail. In this article, I am going to keep verbosity to a minimum and just give you the commands ! I am hoping this will be refreshing for my audience. If you are curious however, about the what, when and why please read my previous article.

Pre-requisites

  1. You need a machine with x86_64 architecture with at least 4 GB of memory & 2 NIC’s.
  2. On this machine you need to install CentOS 7 as a minimal install
  3. You should create a user with admin privileges (i.e. wheel, in my case ‘tuxninja’ was created)
  4. Disable SELinux
    1. vi /etc/sysconfig/selinux
    2. SELINUX=disabled
    3. save changes

Jumping Right In

Here are the commands you need to run.

  1. sudo yum update -y
  2. sudo yum install -y https://repos.fedorapeople.org/repos/openstack/openstack-kilo/rdo-release-kilo-1.noarch.rpm
  3. sudo yum install epel-release
  4. sudo yum install -y openstack-packstack

Now at this point if you ran ‘packstack’ you would run into a bug with this message

ERROR : Error appeared during Puppet run: 192.168.1.10_prescript.pp
Error: Could not find data item CONFIG_USE_SUBNETS in any Hiera data file and no default supplied at /var/tmp/packstack/053c9a3614de4404b906141268c08f0a/manifests/192.168.1.10_prescript.pp:2 on node diamond.tuxlabs.com

The workaround for this bug is as follows

  1. sudo rpm -e puppet
  2. sudo rpm rpm -e hiera
  3. curl -O https://yum.puppetlabs.com/el/7/products/x86_64/hiera-1.3.4-1.el7.noarch.rpm
  4. sudo rpm -ivh hiera-1.3.4-1.el7.noarch.rpm
  5. vi /etc/yum.repos.d/epel.repo
    1. At the bottom of the [epel] section, after the gpgkey add a newline with: exclude=hiera*
    2. Save the file
  6. sud0 yum install -y puppet-3.6.2-3.el7.noarch
  7. reboot
  8. sudo rm /etc/puppet/hiera.yaml
  9. sudo packstack –allinone

This should successfully install. Godspeed.

Networking

Now that Openstack is setup, we still have to setup our network with private & public routed networks, so we can turn this into a real multi-node setup and ssh to our hosts and let them reach the internet etc. To do this, much like my previous post you need to modify your /etc/sysconfig/network-scripts/ files to reflect this.

[tuxninja@diamond network-scripts]$ cat ifcfg-enp4s0f0
NAME="enp4s0f0"
UUID="e0c3929c-1f9b-44d1-9c59-6c8872f603bd"
DEVICE="enp4s0f0"
TYPE="OVSPort"
NM_CONTROLLED="no"
DEVICETYPE="ovs"
OVS_BRIDGE="br-ex"
BOOTPROTO="none"
ONBOOT="yes"
[tuxninja@diamond network-scripts]$ cat ifcfg-enp4s0f1
NAME=enp4s0f1
UUID=ed50b4b6-2c29-4307-bbb0-f3c923f6552a
DEVICE=enp4s0f1
ONBOOT=yes
NM_CONTROLLED=no
BOOTPROTO=none
NETWORK=10.0.0.0
IPADDR=10.0.0.1
NETMASK=255.255.255.0
[tuxninja@diamond network-scripts]$ cat ifcfg-br-ex
DEVICE=br-ex
DEVICETYPE=ovs
TYPE=OVSBridge
BOOTPROTO=static
IPADDR=192.168.1.10
NETMASK=255.255.255.0
GATEWAY=192.168.1.1
DNS1=8.8.8.8
DNS2=8.8.4.4
DNS3=192.168.1.1
ONBOOT=yes
[tuxninja@diamond network-scripts]$

Note: I deleted all the IPV6 crap, I think it messes some stuff up. When your done making the changes with your favorite editor, restart networking : sudo /etc/init.d/network restart or sudo systemctl restart network

Next go into in the Horizon Dashboard GUI and delete the demo project. See my previous article for details on how.

Back On the All-In-One Node Console

[root@diamond ~]# source keystonerc_admin 
[root@diamond ~(keystone_admin)]# neutron router-create router1
[root@diamond ~(keystone_admin)]# neutron net-create private
[root@diamond ~(keystone_admin)]# neutron subnet-create private 10.0.0.0/24 --name private_subnet
[root@diamond ~(keystone_admin)]# neutron router-interface-add router1 private_subnet
[root@diamond ~(keystone_admin)]# neutron net-create public --router:external
[root@diamond ~(keystone_admin)]# neutron subnet-create public 192.168.1.0/24 --name public_subnet --enable_dhcp=False --allocation-pool start=192.168.1.51,end=192.168.1.99 --gateway=192.168.1.1
[root@diamond ~(keystone_admin)]# neutron router-gateway-set router1 public

Next ‘reboot’ or restart all openstack services :

for service in `openstack-service list`; do openstack-service restart $service; done

Note: it appears the –full-restart flag is gone, used to work !

When logging into your dashboard located at http://192.168.1.10/dashboard at some point you might hit a bug that prevent you from logging into the Horizon dashboard see : https://bugzilla.redhat.com/show_bug.cgi?id=1218894 … the work-around for this is to clear your browser cookies.

You’re Done

That’s it. Next steps would be to create a project & new admin user, re-create the required network mappings in openstack using the above commands (modify the names to make them unique) and create your ssh key, import it, download some images, import them using glance, and create some VM’s. Also I like to delete the demo project (you can also prevent this from being created with a flag on the packstack command). Make sure you delete all default security rules and add back ICMP, TCP, and UDP allow ingress / egress rules for 0.0.0.0 aka any/any, again you can see my article on CentOS 6.5 with more specifics on how to do this. Additionally, I have an article on how to add additional compute nodes as well.

As always I can be reached for assistance @ tuxninja [at] tuxlabs.com

Happying Stacking !

Installing Openstack Kilo on Centos 7 Read More »

Creating a bootable USB for Centos on Mac OS X

I’m a huge Ubuntu fan. However, most of my ‘day job’ work requires CentOS or RHEL, thus I commonly have to re-image my on premise Cloud with the latest and greatest CentOS. My servers are 3 Rackables by SGI, two with more CPU & Memory and one (the controller node) with tons of Disk (12x1TB RAID 10) and then for off-premise I use Digital Ocean who has a fantastic product. Most modern servers do not have a CDROM and neither do my on premise systems. Therefore, I need to place the CentOS image on a USB drive so I can re-image my lab. Here are the steps do that on Mac OS X.

List the current Disks & Partitions

➜  ~  diskutil list
/dev/disk0
   #:                       TYPE NAME                    SIZE       IDENTIFIER
   0:      GUID_partition_scheme                        *500.3 GB   disk0
   1:                        EFI                         209.7 MB   disk0s1
   2:          Apple_CoreStorage                         499.4 GB   disk0s2
   3:                 Apple_Boot Recovery HD             650.0 MB   disk0s3
/dev/disk1
   #:                       TYPE NAME                    SIZE       IDENTIFIER
   0:                  Apple_HFS Macintosh HD           *499.1 GB   disk1
/dev/disk2
   #:                       TYPE NAME                    SIZE       IDENTIFIER
   0:      GUID_partition_scheme                        *2.0 GB     disk2
   1:                  Apple_HFS Untitled                1.9 GB     disk2s1
➜  ~

My USB drive is the 2GB drive at the bottom, we need to unmount that

➜  ~  diskutil unmountDisk /dev/disk2
Unmount of all volumes on disk2 was successful
➜  ~

Next we copy the CentOS image onto the unmounted USB disk.

➜  ~  sudo dd if=/Users/jriedel/Downloads/CentOS-7-x86_64-Minimal-1503-01.iso of=/dev/disk2
Password:
1302528+0 records in
1302528+0 records out
666894336 bytes transferred in 620.521343 secs (1074732 bytes/sec)
➜  ~

When that’s gets done your Mac will pop up a window asking you to initialize the drive, ignore that. Remove it, and your ready to boot off this USB!


Creating a bootable USB for Centos on Mac OS X Read More »

Preventing (bind9) DNS Naughty-ness (named.conf & iptables/ufw) on Ubuntu

If you run a DNS server on the Internet with a default configuration many people/robots will take advantage of you. The same is true for Mail, but that is another article. Needless to say if you are running a service on the Internet, the naughty goblins will find you. To thwart these dirty criminals all that’s necessary is to configure your named.conf properly. However, since these robotos are being naughty there is a high degree of certainty they are infected endpoints, and as such I really don’t want them coming anywhere near me or my machines. After all for humanity sake we don’t want to be infected by the deadly plague ! This article is short and sweet, here is how to protect your DNS server & your server in one article using named.conf & ufw (iptables).


Named.conf.options

Now a days named.conf is really just a file that inherits 3 other files, named.conf.local, named.conf.options, and named.conf.default-zones. The one we are going to fix is named.conf.options. The configuration below should only be applied in a scenario where you want to run an authorative nameserver, and a caching name server, but the key is you only want to allow people to query the cache that ‘you know personally or are you’ vs. allowing the entire internet, because then bad things happen. If this is not the setup you are going for, don’t do this 🙂 But if it is follow along.

Add the following section with the proper IP’s to the top fo the file

acl "trusted" {
192.241.206.98;
localhost;
localnets;
};

Note you can also add a CIDR for a subnet like 192.168.0.0/16

After that’s done under the options {} section… make it look like this

        allow-query { any; };
        allow-recursion { trusted; };
        allow-query-cache { trusted; };
        allow-transfer { 202.157.182.142; };

Note, allow transfer is necessary if you have a secondary nameserver that needs to receive updates. Now restart bind9

tuxninja@tlprod1:/etc/bind$ sudo service bind9 restart

Ok now all querying including behavior from non-trusted people will not be allowed. If it is working check your /var/log/syslog and you will see some denies like this

Nov 11 16:00:31 tlprod1 named[952]: client 192.163.221.224#80 (hehehey.ru): query (cache) 'hehehey.ru/ANY/IN' denied
Nov 11 16:00:31 tlprod1 named[952]: client 104.37.29.110#4761 (hehehey.ru): query (cache) 'hehehey.ru/ANY/IN' denied

Now the above is from my actual log file. I was quite annoyed that clients are basically abusing the hell out of hehehey.ru… so I decided I don’t want to talk to those people at all. To those people I should be a blackhole. To do this I used UFW which is short for uncomplicated firewall, which essentially makes dealing with Iptables much much nicer. It’s only my 2nd time using UFW, but I’ve been using Iptables for well over a decade. Anyway, here is my simple setup with UFW that I came up with.

tuxninja@tlprod1:/etc/bind$ sudo ufw default deny incoming
Default incoming policy changed to 'deny'
(be sure to update your rules accordingly)

tuxninja@tlprod1:/etc/bind$ sudo ufw default allow outgoing
Default outgoing policy changed to 'allow'
(be sure to update your rules accordingly)

tuxninja@tlprod1:/etc/bind$ sudo ufw allow ssh
Rules updated
Rules updated (v6)

tuxninja@tlprod1:/etc/bind$ sudo ufw allow 80
Rules updated
Rules updated (v6)

So we are configuring the default policy to deny all incoming traffic, allow outgoing, and then allow SSH & Apache/Web traffic basically. Next I created a script called block.sh to add ufw deny rules for bad actors I parsed out of my log, here’s what block.sh looks like

# cat block.sh 
#!/bin/bash

while read line; do
	ufw deny from $line
done

Don’t forget to chmod +x your shell script. Then I did this… blocking all bad actors…

root@tlprod1:~# cat /var/log/syslog | grep hehehey.ru | grep -v repeated | awk -F ' ' '{print $7}' | cut -d '#' -f 1 | ./block.sh

Note, use sudo if you don’t run this as root. This will go through my log and find all these bad requests, and block the requestor. It’s quite aggresive, so be careful, make sure you thoroughly limit your parsing with grep to only block things you really don’t want talking to your server, because this blocks ALL traffic from this requestor to your service, not just DNS.

Once that is complete you need to finally permit good DNS requests by running

ufw allow 53

And then finally enable your firewall

ufw enable

If you are successful you should see entries in your log that look like this

Nov 11 15:10:35 tlprod1 kernel: [1652178.544292] [UFW BLOCK] IN=eth0 OUT= MAC=04:01:63:57:8a:01:3c:8a:b0:0d:3f:f0:08:00 SRC=65.60.18.103 DST=192.241.206.198 LEN=72 TOS=0x00 PREC=0x00 TTL=247 ID=31303 PROTO=UDP SPT=20225 DPT=53 LEN=52

You can also view all your firewall rules by running

sudo ufw status numbered

Happy Blocking !


Preventing (bind9) DNS Naughty-ness (named.conf & iptables/ufw) on Ubuntu Read More »

Deployment Architecture & Stateless vs. Stateful Services

The following is intended to be a primer on deployment architecture for systems engineers & software engineers. This is the first architecturally focused post on this blog. The hope is that it will serve as a foundation for future architecturally focused blog posts that I hope you find value in.

The Motivation For This Article

I have been an Operations Architect by trade for many years. One of the primary functions I have in this role is reviewing each teams software architecture to figure out the right way to deploy & scale their system while providing the maximum availability for it, and while not jeopardizing the existing more complex system. One of the most important lessons I learned about software architecture while doing this role many years ago, was the difference between a stateless and stateful service. Why you ask ? In short because knowing whether a service was stateless or stateful dictated how I should scale & provide high availability to the service on the infrastructure side. It told me the proper deployment architecture to use.

What Are Stateless Services ?

A stateless service is a service that can handle each incoming request, without knowing anything about any previous request.  Meaning, the processing of any request doesn’t require getting data about any previous requests from a database or session store. What this means is that each instance of this service (in our example a web server) can be scaled independently. To provide maximum availability for a stateless service all you need are instances ! Lot’s and lot’s of instances/nodes/vms/containers etc.. aka redundancy ! Very simple right ? And you should have seen this a thousand times if you have ever run an infrastructure that supports a website.

How To Deploy & Scale Stateless Services

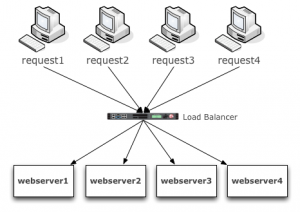
Here is a quick picture of how we scale a stateless service.

SimpleStateless

Pretty straight forward. No matter how many incoming requests there are, they can be distributed amongst X number of web servers. The application running on each web server will reply with the correct response, because it has everything it needs to reply.  More to the point it doesn’t need to lookup any previous result or ‘state’ information in a database somewhere to know what to reply with. If we need more capacity, we add more web server instances. If one of the web servers fail, we have X number of servers behind the load balancer, that can still handle the requests. You should be able to see clearly how easy it is to scale and provide high availability for stateless services. Most companies deploy this kind of pattern regionally, such that you can lose an entire region and requests will still be processed in another region. Anyone who runs on AWS, like Netflix for example, does this for their stateless services. Now let’s talk about the uglier brother.

What Are Stateful Services?

If stateless services are services that can process requests without knowing anything about the previous request, it should be pretty self explanatory what a stateful service is right 😉 ?

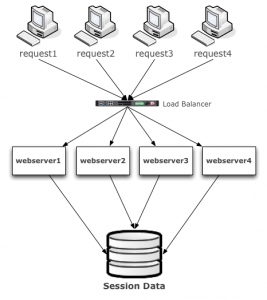
A stateful service is a service that depends on the result of a previous request to process a subsequent request. If a web request depends on the result of a previous request, how would it get that result ?  By looking that result up in a database. However, in order to look up the result of a previous request, we have to know something about the request we want to look up. For example, the user or unique session id the request came from. If we knew the user or session that performed the original request, we could then query for that result when the subsequent request comes in from that user. But how is this actually implemented ?

Usually, upon the initial request a session cookie is created, in it a unique identifier is stored and upon subsequent requests from that same browser the web server receiving the request also receives the unique identifier and can query the database for whatever information it needs related to the users session. The information in that session is called ‘state’ and it is usually modified frequently as the user makes more requests moving about the website.

Before we move here is a quick graphic of this architecture

SimpleStateful

Btw, have you ever heard someone say, my applications requires sticky or persistent load balancing ? That is because their application is stateful, but they do not have a session store. Forcing the load balancer to send the request back to the same machine is a cheap & horrible way to solve this problem. </end rant> Moving on…

How To Deploy & Scale Stateful Services

There are two approaches to deploying stateful services ‘active/active’ and ‘active/passive’. Active/Active is the preferred deployment pattern, but it is also more cumbersome to deploy. To keep this example simple, we will avoid NoSQL flavors in our example (although these are commonly preferred for session stores) and use MySQL in our example instead.

Active/Active MySQL

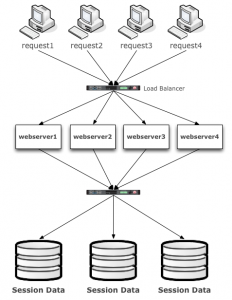
Active / Active also known as Multi-Master refers to having two or more (database) nodes or instances available AND servicing requests actively using two or more nodes. The benefits of Active/Active are bountiful. You can lose a node, without having to failover. You can add a node to scale out for more capacity & performance. As with anything there are limits to how far out you can scale, but active/active still the best deployment architecture for databases today.

SimpleActiveActive

Btw, if you deploy this architecture make sure you pay special attention to your Load Balancer layer. In my opinion a pair of active/passive LTMs is not enough. Remember your availability is only as good as your weakest link. Solves here might include, Any Cast, BGP, GTM, and replication + retry to other regions.

Active/Passive MySQL

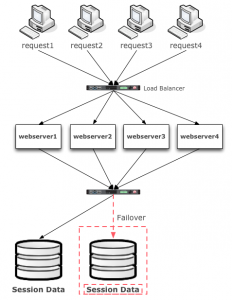
Active/Passive aka Master/Slave refers to having one database node or instance available to service requests actively and having another spare node that can be elected as the master (i.e. failed over to) in the event of a failure on the primary node. Again, this is easier to implement, but does not scale as well, nor does it provide great availability due to the time it takes to failover and due to the fact that a failover node is typically not regularly tested.  A ‘warm’ node where transactions are constantly being ran through it aka the active/active pattern we discussed in the previous example is always superior.

SimpleActivePassive

Summary

Early in my career I learned these application characteristics and common patterns for how to deploy applications with these constraints in the best way possible. However, this is the tip of the ice berg. With todays technology stacks we are running a lot more than just websites. Many systems being deployed now include things like Message Buses, NoSQL stores, and Clusters. Each of these categories and more importantly the technologies within them have additional features & constraints surrounding their availability and scalability. My hope is that this article gave you a strong foundation for you to continue your own learning as it relates to deployment architecture & infrastructure for stateless and stateful systems so that you can deploy scalable & highly available architectures.

Keep Learning,
Jason Riedel

Deployment Architecture & Stateless vs. Stateful Services Read More »