A brief introduction of Openstack + My thoughts
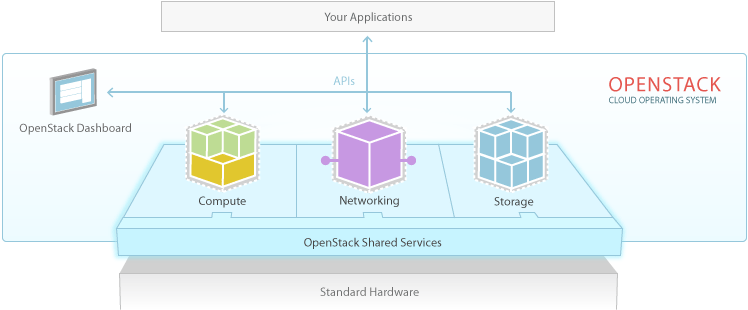
Openstack is open-source software for building clouds. It was created in 2010 by people from Rackspace & NASA, but is currently managed by the non-profit Openstack Foundation, which includes members from the who’s who of the technology sector that have joined forces to continue to invest & develop Openstack (written in Python) for fun and profit( well not so much ). It is definitely fun though :-). In fact I have been having nothing, but a blast since the moment I meant Openstack in 2012. However, admittedly the first time I worked on Openstack it was on the Essex release and I felt it had a ways to go before it was ready for prime time. At that time it was not only hard to install, but most of the people around it were hard core Pythonista’s (Python developers), that were rapidly trying to a mature Openstack & it’s ecosystem that just wasn’t production ready yet. And while the latest release of Openstack ‘Icehouse‘ (which I am covering in this blog) is leaps and bounds better, it can still be quite a PITA(Pain In The Ass) for first timers. In fact I still struggle with the idea of running Openstack in production because it requires an incredible amount of resources, engineering skill & organizational persistence to do so. Companies willing to embark on this journey thus far have included Mercado Libre, Dell, HP, Redhat, Canonical (the Ubunut guys), eBay, PayPal and Symantec among many others. These companies were required to beef up their engineering staff & allocate large amounts of resources just to take on this challenge. In addition their commitments were probably tested over and over again and their leadership had to respond with tremendous faith when timelines began to slip. However, organizations that complete this journey recognize that the return at the end of the tunnel is a compounding return. For starters you aren’t locked into to a vendor like VmWare or AWS (Amazon Web Services) who are both incredibly expensive, but the compounding return comes from skills it will build internally and the culture that will be a bi-product.
Coming here to Tuxlabs means you have personally accepted this mission to learn Openstack and you are in need of some guidance don’t worry you are in good hands. I will show you the light, which can be hard to see through the darkness if you try to take on the documentation all by yourself : http://docs.openstack.org/
So sit back, relax, read, and type exactly as I do. In the end you will have a perfectly functioning Openstack Icehouse cloud and if you decide to bring this into your organization remember with great power comes great responsibility…
You will change everyone in your organization from a POSA (Plain Old Sys Admin’s) to Cloud Engineers and Architects jumping into the Openstack Python code base at the sniff of an issue.
Devstack
Devstack is a shell script used to quickly and easily deploy an all-in-one install of Openstack on any machine or VM for the purposes of trying, testing, and developing on Openstack. It is extremely easy to install, use and get going, if you have not used Devstack already I recommend trying it first because it is a quick and easy way to get a learning win + it will help you decide what you want to learn more about and whether or not Openstack is what you are looking for. However, you do not want to run Devstack in production for starters because production deployments should be multi-node setup’s not all Cloud services deployed on one machine like Devstack does.
The Book
My favorite Openstack book to date is by far is the Openstack Cloud Computing Cookbook written by Kevin Jackson. This book is so great because gets straight to business giving you the commands & understanding needing to get Openstack up and running quickly unlike most other book that bore you with unnecessary details. The first time I installed Openstack Essex I used this book and it worked like a charm, however, that was on Ubuntu, which this book was written for. If you want to install Openstack on Redhat you can do so from scratch or you can use RDO.
RDO
RDO technically doesn’t stand for anything ! http://openstack.redhat.com/Frequently_Asked_Questions#What_does_RDO_stand_for.3F, but I don’t really buy that and have found some people expanding the acronym to the Redhat Distribution of Openstack which I think sounds incredibly fitting. RDO has a website dedicated to a community of people running Openstack on Redhat, CentOS and Fedora. Because Redhat is still the leader in production Linux deployments in the enterprises of the world, I chose to use it in my own lab environment & for the purposes of this tutorial. However, because I cannot afford the license cost of Redhat Enterprise Linux I am using the free community release of RHEL known as CentOS or the Community Enterprise Operating System. For the purposes of this tutorial we will be installing CentOS 6.5 with a minimal install on a bare metal system and then installing Packstack according to the instructions on the RDO website. Then we will go a step further.
Getting Started
A production Openstack deployment has a minimum of 3 nodes one for the Controller, Network, and Compute nodes and that would not cover a Highly Available deployment where you would need the capability to failover functions to standby nodes when there was an outage or maintenance needed. However, for the purposes of this article I will be showing you what is called an all-in-one install where the Controller, Network, and Compute functions all live on the same node and in future articles we will expand on this knowledge to build a production capable multi-node deployment of Openstack.
Before We Begin
You will need…
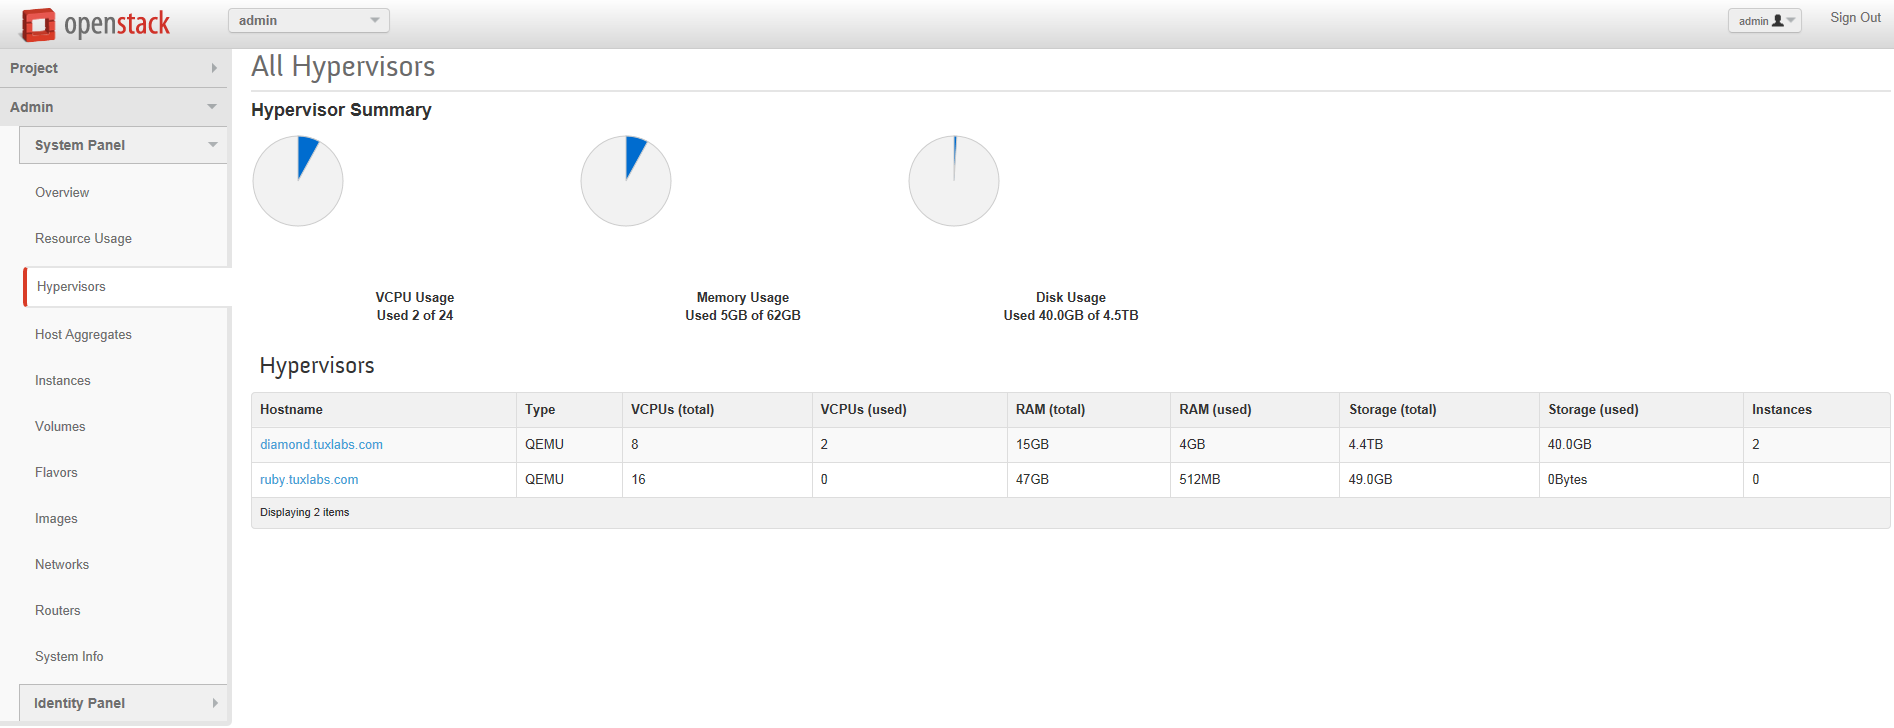
- A system that you have root access to, to install Openstack on. I am using an SGI Rackable with 16GB of RAM and 4.5TB of usable disk ( in a hardware RAID 10). Openstack does not require a lot of resources, but if you’re going to spawn a lot VM’s you need a lot of Cores (vCPU’s), Memory and Storage. See this link for more info: http://docs.openstack.org/grizzly/openstack-compute/install/yum/content/compute-system-requirements.html
- That system should have dual NIC’s, although I think it is possible to use virtual interfaces for a lab environment if you have to.
- To configure the hostname of your controller in DNS mine is diamond.tuxlabs.com, but most people go with controller.yourdomain.com (if you don’t have or use DNS, just make sure you configure your hosts file /etc/hosts with the information)
- The system you use should have CentOS 6.5 installed with a Minimal Install using the defaults no extra’s.
- Your brain, keyboard, fingers and a fresh beer and possibly an ice chest with more beer depending on how far the fridge is.
Assumptions
- Our home network uses 192.168.1.0/24 and has access to the internet.
- It has DHCP enabled, but only for 192.168.1.150-199.
- We are not using 10.0.0.0/24 for anything so we can use it for our private network in Openstack.
If these are true we should be able to follow my examples exactly, but if you want to change your networks you will have to substitute them as needed.
Setting Up Our Initial System
First become root or login as root, then…configure the following configuration files to match.
Resolve.conf
This assumes our gateway device @ 192.168.1.1 runs DNS (like the Linksys’s do). If 192.168.1.1 doesn’t run DNS do not add it to resolve.conf.
[root@diamond tuxninja]# cat /etc/resolv.conf
nameserver 8.8.8.8
nameserver 192.168.1.1
[root@diamond tuxninja]#
Sudoers
Make sure wheel is uncommented.
[root@diamond tuxninja]# cat /etc/sudoers | grep '%wheel' | grep -v '#'
%wheel    ALL=(ALL)    NOPASSWD: ALL
[root@diamond tuxninja]#
Setup Your Primary Network Interface
[root@diamond tuxninja]# cat /etc/sysconfig/network-scripts/ifcfg-eth0
DEVICE=eth0
HWADDR=00:15:17:65:F9:98
TYPE=Ethernet
ONBOOT=yes
NM_CONTROLLED=yes
BOOTPROTO=static
IPADDR=192.168.1.10
NETMASK=255.255.255.0
GATEWAY=192.168.1.1
NAMESERVER=192.168.1.1
[root@diamond tuxninja]#
Restart Networking
/etc/init.d/network restart
Next Add A Local User (Cause logging in as root is lame)
adduser tuxninja
passwd tuxninja
Set your password to something good, then add the user to the wheel group.
usermod -G tuxninja,wheel tuxninja
Installing Dependencies
Next we need to install some basic dependencies so things like scp, yum, wget and nslookup work.
yum install -y openssh-clients
yum install -y yum-utils
yum install -y wget
yum install -y bind-utils
Turn Off SELinux
Yes security is important, but unfortunately to install Openstack without a headache you need to turn off SELinux.
[root@diamond tuxninja]# cat /etc/sysconfig/selinux  | grep SELINU | grep -v '#'
SELINUX=disabled
SELINUXTYPE=targeted
[root@diamond tuxninja]# reboot
Don’t forget to reboot or the setting will not take effect.
Configuring Networking
There are many ways to configure Openstack networking and it can be quite complicated, so we are going to use what I consider the simplest method using Openvswitch.
Before we begin, make sure you can ping yahoo.com before we go mucking with the configs. We are going to change how your primary network interface is configured and then configure two additional interfaces. Do your best to match these configurations exact, making a mistake here might cause Openvswitch to barf on itself and that would not be fun to troubleshoot.
[root@diamond tuxninja]# cat /etc/sysconfig/network-scripts/ifcfg-eth0
DEVICE=eth0
HWADDR=00:15:17:65:F9:98
TYPE=OVSPort
DEVICETYPE=ovs
OVS_BRIDGE=br-ex
ONBOOT=yes
[root@diamond tuxninja]# cat /etc/sysconfig/network-scripts/ifcfg-eth1
DEVICE=eth1
HWADDR=00:15:17:65:F9:99
TYPE=Ethernet
ONBOOT=yes
NM_CONTROLLED=no
BOOTPROTO=none
NETWORK=10.0.0.0
IPADDR=10.0.0.1
NETMASK=255.255.255.0
[root@diamond tuxninja]# cat /etc/sysconfig/network-scripts/ifcfg-br-ex
DEVICE=br-ex
DEVICETYPE=ovs
TYPE=OVSBridge
BOOTPROTO=static
IPADDR=192.168.1.10
NETMASK=255.255.255.0
GATEWAY=192.168.1.1
DNS1=8.8.8.8
DNS2=8.8.4.4
ONBOOT=yes
[root@diamond tuxninja]# /etc/init.d/network restart
What Is This Doing ?
The above configuration(s) is setting eth0 as an OVSPort that is bridged to the interface br-ex. eth1 is configured normally for our private 10 network, and br-ex is configured as a OVSBridge with our actual IP information from / for eth0.
After Restarting Networking ifconfig Output Should Look Like This
[root@diamond tuxninja]# ifconfig eth0
eth0      Link encap:Ethernet  HWaddr 00:15:17:65:F9:98
          inet6 addr: fe80::215:17ff:fe65:f998/64 Scope:Link
          UP BROADCAST RUNNING MULTICAST  MTU:1500  Metric:1
          RX packets:322092 errors:0 dropped:0 overruns:0 frame:0
          TX packets:187420 errors:0 dropped:0 overruns:0 carrier:0
          collisions:0 txqueuelen:1000
          RX bytes:436592198 (416.3 MiB)  TX bytes:15605772 (14.8 MiB)
          Interrupt:18 Memory:b8820000-b8840000

[root@diamond tuxninja]# ifconfig eth1
eth1      Link encap:Ethernet  HWaddr 00:15:17:65:F9:99
          inet addr:10.0.0.1  Bcast:10.0.0.255  Mask:255.255.255.0
          inet6 addr: fe80::215:17ff:fe65:f999/64 Scope:Link
          UP BROADCAST RUNNING MULTICAST  MTU:1500  Metric:1
          RX packets:0 errors:0 dropped:0 overruns:0 frame:0
          TX packets:8 errors:0 dropped:0 overruns:0 carrier:0
          collisions:0 txqueuelen:1000
          RX bytes:0 (0.0 b)  TX bytes:552 (552.0 b)
          Interrupt:19 Memory:b8800000-b8820000

[root@diamond tuxninja]# ifconfig br-ex
br-ex     Link encap:Ethernet  HWaddr 00:15:17:65:F9:98
          inet addr:192.168.1.10  Bcast:192.168.1.255  Mask:255.255.255.0
          inet6 addr: fe80::a8db:16ff:fed6:f4c4/64 Scope:Link
          UP BROADCAST RUNNING  MTU:1500  Metric:1
          RX packets:293 errors:0 dropped:0 overruns:0 frame:0
          TX packets:151 errors:0 dropped:0 overruns:0 carrier:0
          collisions:0 txqueuelen:0
          RX bytes:43799 (42.7 KiB)  TX bytes:15786 (15.4 KiB)

[root@diamond tuxninja]#
For more information on Openstack networking here are some references that I used.
- https://www.youtube.com/watch?v=afImoFeuDnY
- http://openstack.redhat.com/Neutron_with_existing_external_network
- http://openstack.redhat.com/forum/discussion/780/confused-with-neutron-and-external-network-access/p1
- http://openstack.redhat.com/Networking_in_too_much_detail
- http://docs.openstack.org/grizzly/openstack-network/admin/content/
Update Packages
Finally since we are running a minimum install, let’s update all of our packages before continuing.
[root@diamond tuxninja]# sudo yum update -y
Installing Openstack
Finally we are ready to install Openstack Using Packstack.
[root@diamond tuxninja]# sudo yum install -y http://rdo.fedorapeople.org/rdo-release.rpm
[root@diamond tuxninja]# sudo yum install -y openstack-packstack
[root@diamond tuxninja]# packstack --allinone --provision-all-in-one-ovs-bridge=n --provision-demo=n
The first command adds the required RDO repo to yum install packstack. The second downloads the openstack-packstack package. And the third and final command is magic. This command installs packstack. We are telling it to install all openstack components to one machine the –provision-all-in-one-ovs-bridge=n tells packstack we are going to be using a single node (although I am still not entirely sure this flag is absolutely necessary) and the final flag tells packstack not to deploy the demo project, because if you do you have to end up deleting it before you can delete the network information and re-create it correctly.
Packstack will take about 10 minutes to run. It uses puppet to deploy Openstack and it’s required configurations. In my experience it works pretty well, however if you do need to re-install packstack there isn’t an automated uninstall script included. So someone created one and here it is in case you need it.
[root@diamond tuxninja]# cat packstack_uninstall.sh
#!/bin/bash

# Warning! Dangerous step! Destroys VMs
for x in $(virsh list --all | grep instance- | awk '{print $2}') ; do
    virsh destroy $x ;
    virsh undefine $x ;
done ;

# Warning! Dangerous step! Removes lots of packages
yum remove -y nrpe "*nagios*" puppet "*ntp*" "*openstack*" \
"*nova*" "*keystone*" "*glance*" "*cinder*" "*swift*" \
mysql mysql-server httpd "*memcache*" scsi-target-utils \
iscsi-initiator-utils perl-DBI perl-DBD-MySQL ;

# Warning! Dangerous step! Deletes local application data
rm -rf /etc/nagios /etc/yum.repos.d/packstack_* /root/.my.cnf \
/var/lib/mysql/ /var/lib/glance /var/lib/nova /etc/nova /etc/swift \
/srv/node/device*/* /var/lib/cinder/ /etc/rsync.d/frag* \
/var/cache/swift /var/log/keystone /var/log/cinder/ /var/log/nova/ \
/var/log/httpd /var/log/glance/ /var/log/nagios/ /var/log/quantum/ ;

umount /srv/node/device* ;
killall -9 dnsmasq tgtd httpd ;

vgremove -f cinder-volumes ;
losetup -a | sed -e 's/:.*//g' | xargs losetup -d ;
find /etc/pki/tls -name "ssl_ps*" | xargs rm -rf ;
for x in $(df | grep "/lib/" | sed -e 's/.* //g') ; do
    umount $x ;
done
Don’t forget to chmod +x to that bad boy to make it executable so you can run it, when you are ready to uninstall.
Now then, getting back to our install. If Packstack was successful you should see something like this.
 **** Installation completed successfully ******


Additional information:
 * A new answerfile was created in: /root/packstack-answers-20140802-125113.txt
 * Time synchronization installation was skipped. Please note that unsynchronized time on server instances might be problem for some OpenStack components.
 * File /root/keystonerc_admin has been created on OpenStack client host 192.168.1.10. To use the command line tools you need to source the file.
 * To access the OpenStack Dashboard browse to http://192.168.1.10/dashboard .
Please, find your login credentials stored in the keystonerc_admin in your home directory.
 * To use Nagios, browse to http://192.168.1.10/nagios username: nagiosadmin, password: 4bf73f1116544975
 * The installation log file is available at: /var/tmp/packstack/20140802-125113-RzCDrE/openstack-setup.log
 * The generated manifests are available at: /var/tmp/packstack/20140802-125113-RzCDrE/manifests
[root@diamond tuxninja]#
Check Out Our Keystonerc_admin File
Just take note of what environment variables it sets. To login to our GUI we need these credentials and to use any command line functionality we have to source this file in our shell.
[root@diamond tuxninja]# cat ~/keystonerc_admin
export OS_USERNAME=admin
export OS_TENANT_NAME=admin
export OS_PASSWORD=a57c83f56ccc41f5
export OS_AUTH_URL=http://192.168.1.10:5000/v2.0/
export PS1='[\u@\h \W(keystone_admin)]\$ '
[root@diamond tuxninja]#
Configuring Openstack Networking
Because we did not deploy the demo project, the default network configuration in Openstack should not exist. If it does we can login to our GUI @ http://diamond.tuxlabs.com/dashboard by sourcing the credentials above in our keystonerc_admin and delete the network configuration under
- admin –> routers
- admin –> networks
Then you are ready to re-create your network. You could use the GUI to do this, which is pretty straight forward…but since GUI’s are dirty we are going to use the command line.
In order to use any openstack command line utilities you must first source the keystonerc_admin file so the required environment variables are set in your shell. Like so…
[root@diamond ~]# source keystonerc_admin
[root@diamond ~(keystone_admin)]#
Seeing (keystone_admin) in your prompt means you are ready to run commands and here you go
neutron router-create router1
neutron net-create private
neutron subnet-create private 10.0.0.0/24 --name private_subnet
neutron router-interface-add router1 private_subnet
neutron net-create public --router:external=True
neutron subnet-create public 192.168.1.0/24 --name public_subnet --enable_dhcp=False --allocation-pool start=192.168.1.51,end=192.168.1.99 --gateway=192.168.1.1
neutron router-gateway-set router1 public
Copy & pasting this will spit out a lot of messages showing the result set of each command.
The important thing to realize is that your public network has to be configured with an external router. This effectively NAT’s the 10 & 192 networks to make internet access available to your VM’s. When this is configured correctly your Network Topology diagram under the dirty GUI should resemble this.
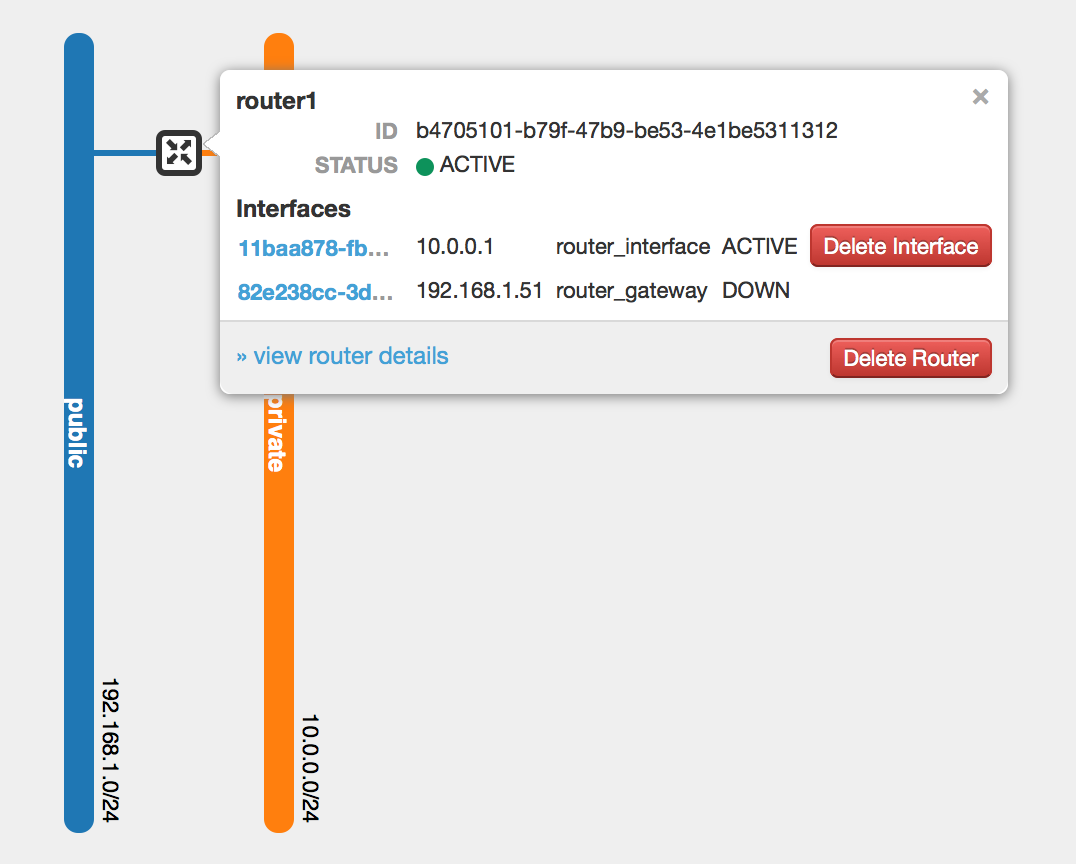
The router_gateway always shows DOWN. No idea why, but someone else said it’s a bug 😉
Next under your project (the admin project) you have to configure your Security Groups under Compute—>Access & Security—>Security Groups. Once there click Manage Rules for the default security group. Delete what’s there. Add Ingress/Egress for ALL ICMP, ALL TCP, and ALL UDP accepting all other defaults on the form. This will open up your firewall completely.
Time To Restart Openstack
Finally we need to restart Openstack, validating that openvswitch-agent starts.
[root@diamond tuxninja(keystone_admin)]# /etc/init.d/network restart;openstack-service --full-restart;openstack-status | grep 'openvswitch-agent'
neutron-openvswitch-agent:              active
Note: You can use openstack-service –full-restart to restart all openstack services.
If openvswitch-agent does not start run back through the above steps and / or consult the references or email me tuxninja [at] tuxlabs.com. This can be a real pain to figure out, but I finally have it down pat.
If openvswitch-agent is active we are good to go. Next we have to create an SSH Key.
Creating Our Cloud’s SSH Key
Our Openstack Cloud has no authentication system for our virtual machines by default. Eventually you could configure an LDAP server, and configure your images or configure in Puppet the required pam configurations to use LDAP for authentication by your VM’s, but for now Openstack allows for a post configuration step after building VM’s where it will add your SSH key. It does this by using the metadata service which cloud images will look for, if they can reach the metadata service @ http://169.254.169.254 then they can copy down the public key and install it on the VM for you allowing you to login to that VM using the VM’s operating system default account (i.e. ubuntu, fedora). Now before I continue there are alternatives such as using guestfish to modify an image’s configuration or using a post install cloud-init configuration to specific a password to an account, but the cleanest and simplest way is to use the metadata service after generating & importing the public key into openstack and assigning it to our VM guest.
To create the key…
[root@diamond tuxninja]# ssh-keygen -t rsa -f cloud.key
Generating public/private rsa key pair.
Enter passphrase (empty for no passphrase):
Enter same passphrase again:
Your identification has been saved in cloud.key.
Your public key has been saved in cloud.key.pub.
The key fingerprint is:
59:e0:b3:0f:c9:d0:8a:67:ba:86:39:0e:fe:b2:93:ce root@diamond.tuxlabs.com
The key's randomart image is:
+--[ RSA 2048]----+
|        .        |
|       o .       |
|      . + .      |
|     . + *       |
|    . + S        |
|     +   o       |
|. .o.     .      |
|o=+ ..           |
|.E*+.            |
+-----------------+
[root@diamond tuxninja]#
I don’t enter a password to use password-less SSH, cause again this is a lab environment and typing passwords sucks.
Launching A VM
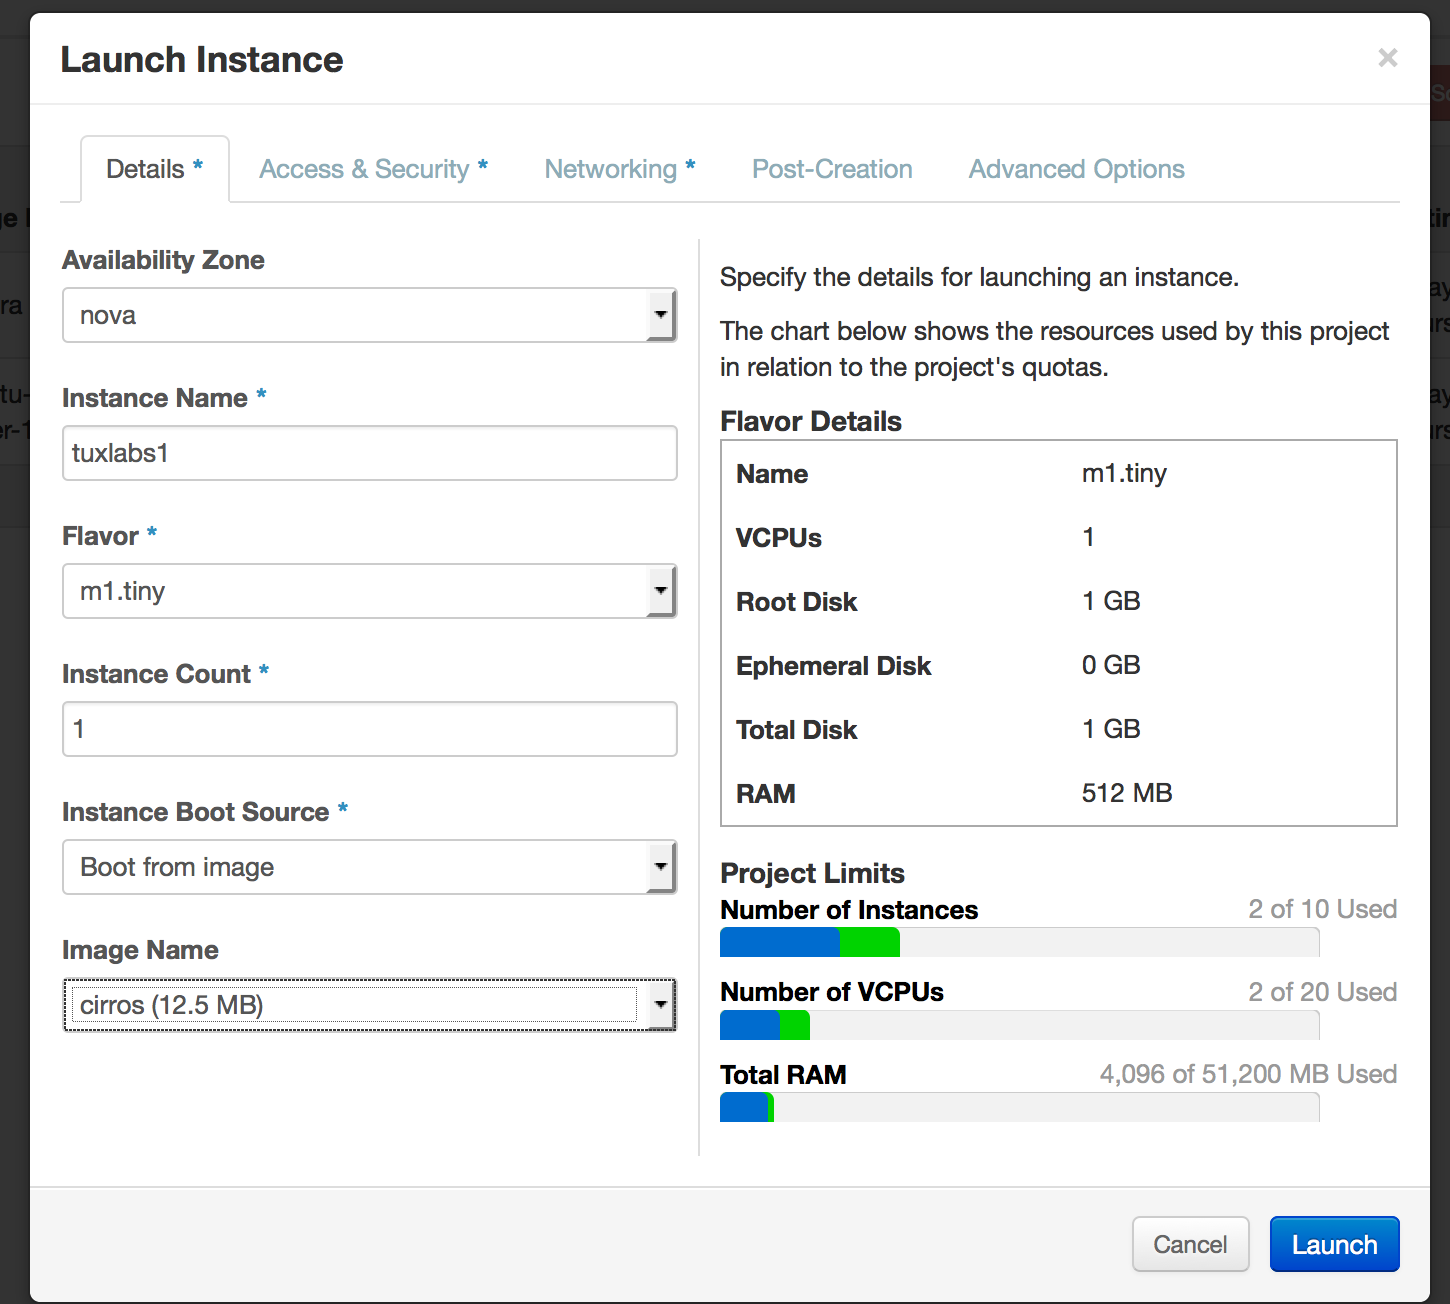
Next you want to launch a VM that we can use to import our SSH key into. Login to the dashboard @ http://diamond.tuxlabs.com/dashboard again using the keystonerc_admin credentials provided. Once inside navigate to Project—>Compute—>Instances and click the Launch Instance button in the upper right corner. You will be presented with a form. Here are the screenshots to guide you through.
Fill out the details tab…
Click the Access & Security Tab…
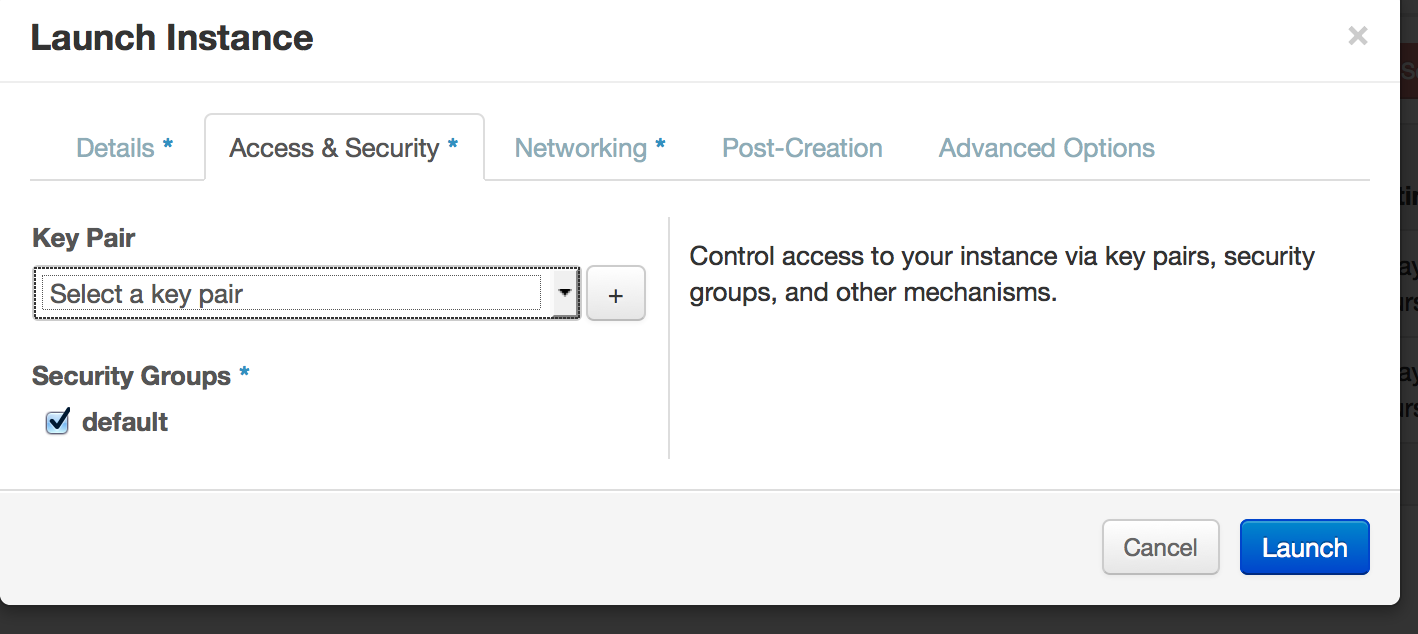
Then Click The + …
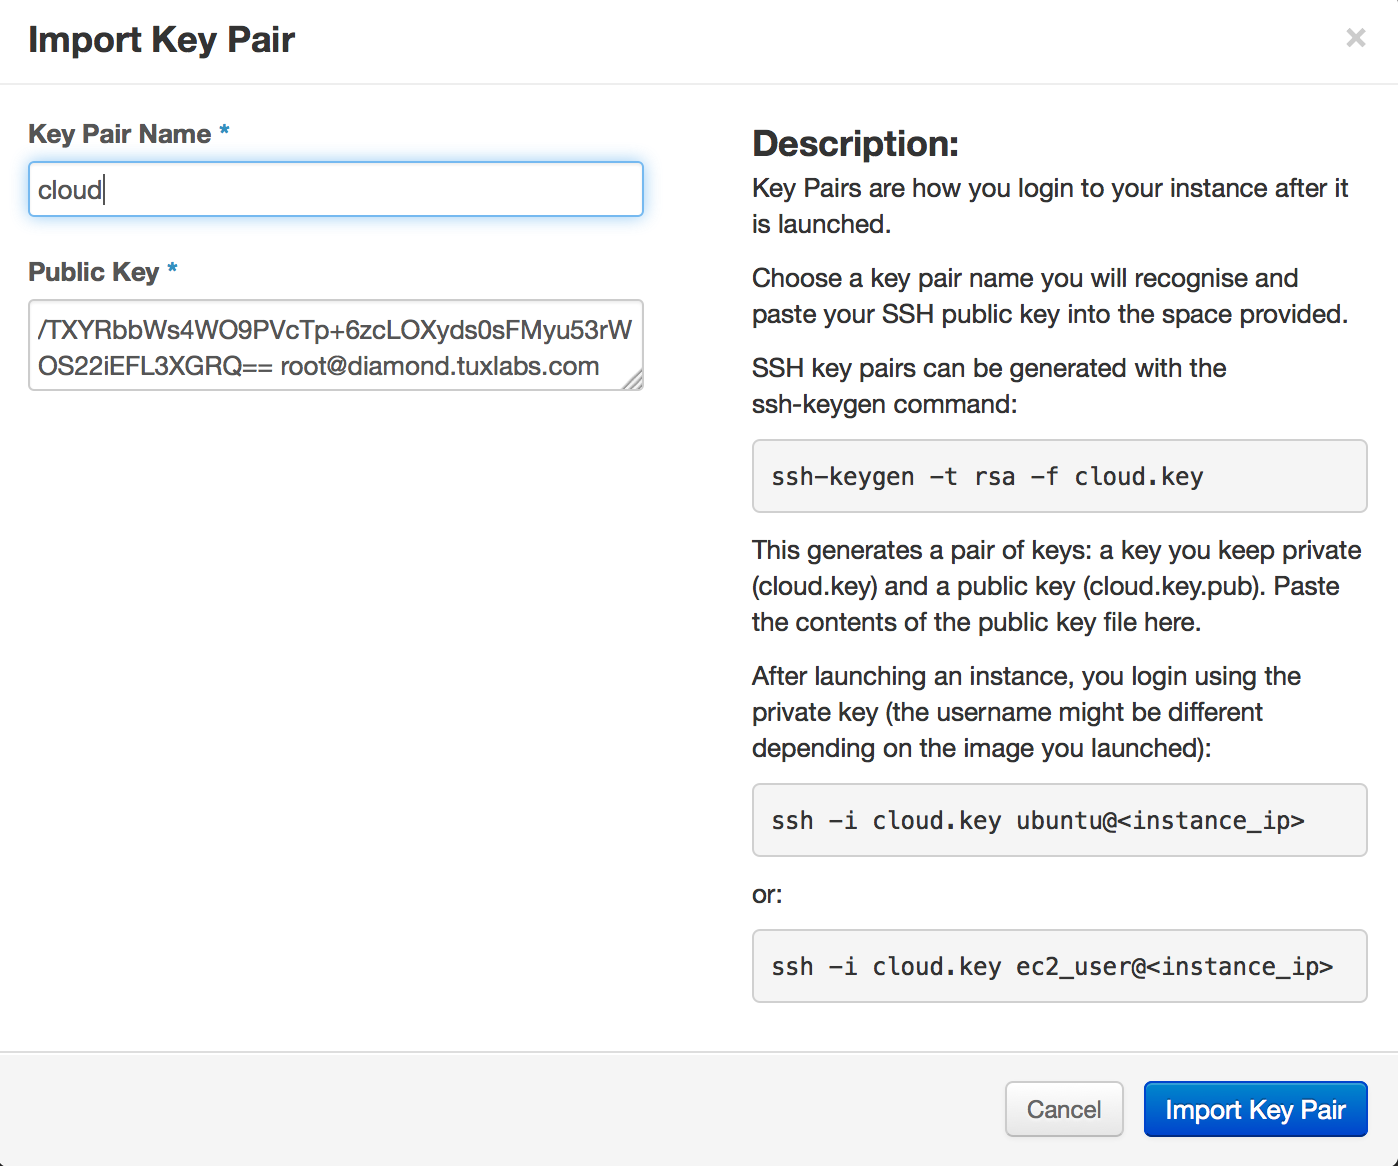
Now in order to fill this out we have to copy and paste the contents (bold part) of the public key we created.
[root@diamond tuxninja]# cat cloud.key.pub
ssh-rsa AAAAB3NzaC1yc2EAAAABIwAAAQEAzs46kFxia6q9gfwmmszFHGFSk5UAQFjLhEOE08I/2F7+Qwh0AFBuO99c/OCITr2HvVfDc7DF5JlRQGohTA9aowtINWyEUvEKSPG8gEtL95GZ5EZH/3pqWFaklIfoP3fbgKPrpPSGarYQY5UH+qm419x+A3tAkmumdd3BtQHLRF1qq9Ui69IQ383MctuOu+sF9Ws6+NT1+MbND++Qp2VNli/+cpZTnv4g9i5C2mXbUQQJghEoUvIXiBh+r27kVOlJ6L3TeT8WIwD1N916ZRgHrfbAEQ+108Zdyc5/TXYRbbWs4WO9PVcTp+6zcLOXyds0sFMyu53rWOS22iEFL3XGRQ== root@diamond.tuxlabs.com
[root@diamond tuxninja]#
Then Click Networking and add the private network…
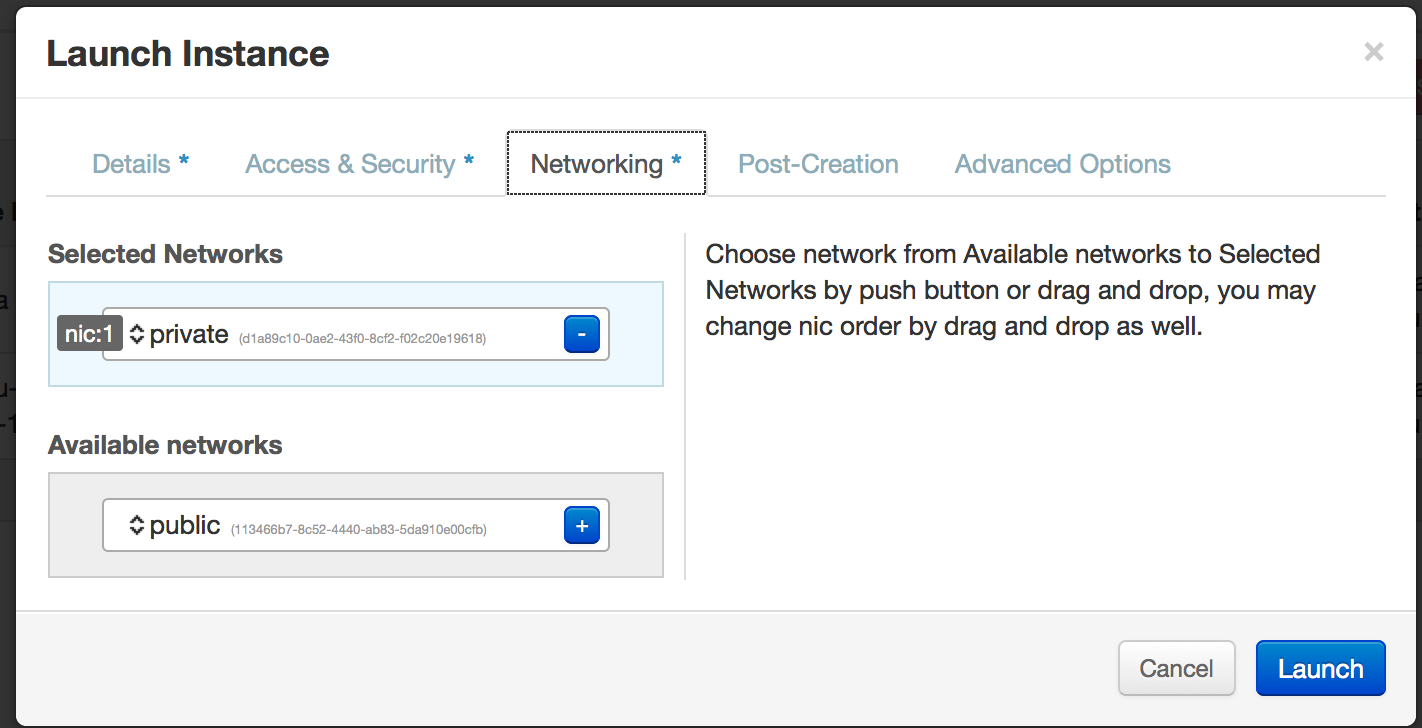
Then click launch….and you should see something like this…

See the status spawning ? When the virtual machine is done being built you will see status changed to ‘Running’, you can watch the machine boot, by clicking the name of the instance and then going to the Log or Console tab.

This is great our VM is running and it has an IP address configured ! But that IP address is only used for Openstack communication, so we still need to associate a floating IP to this system so we can SSH to it. Click on the More dropdown and select Associate Floating IP.
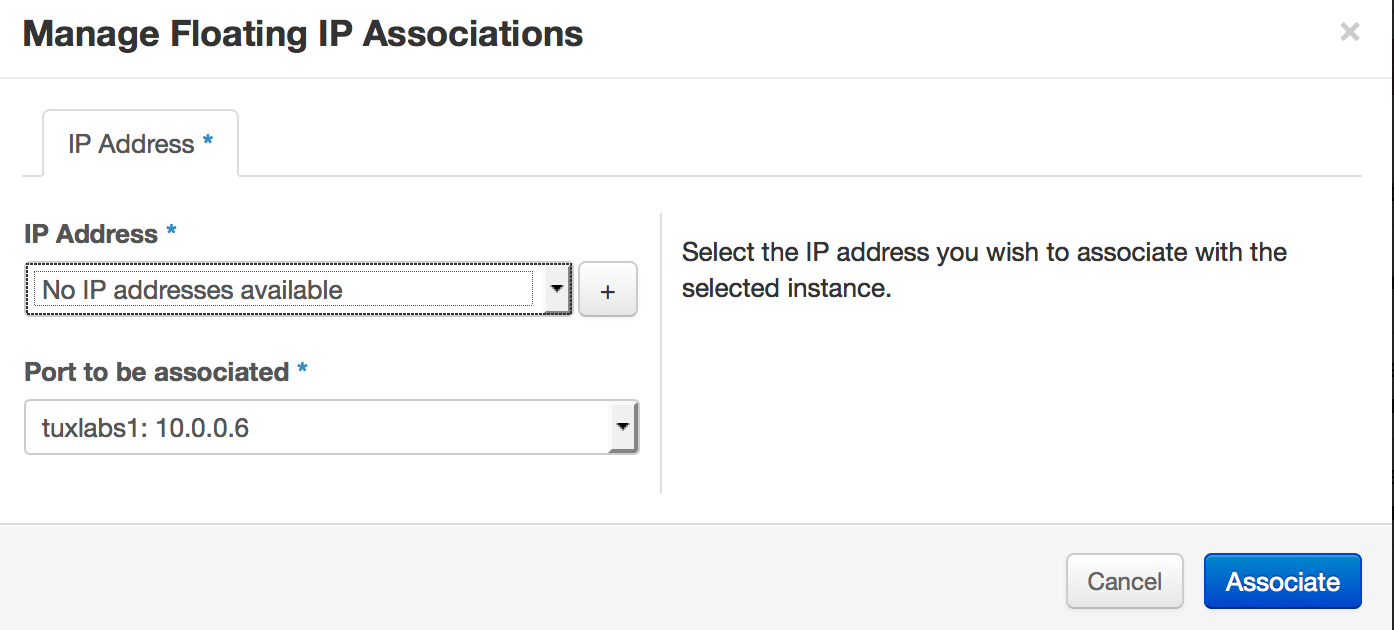
Then click the + …
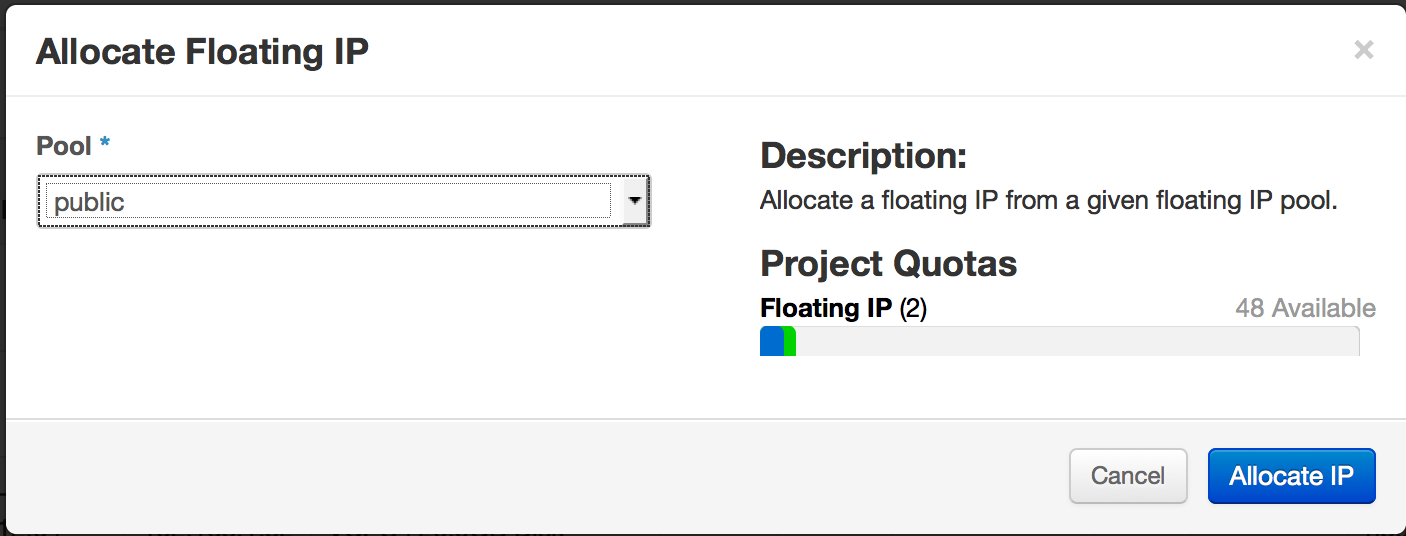
Click Allocate IP…
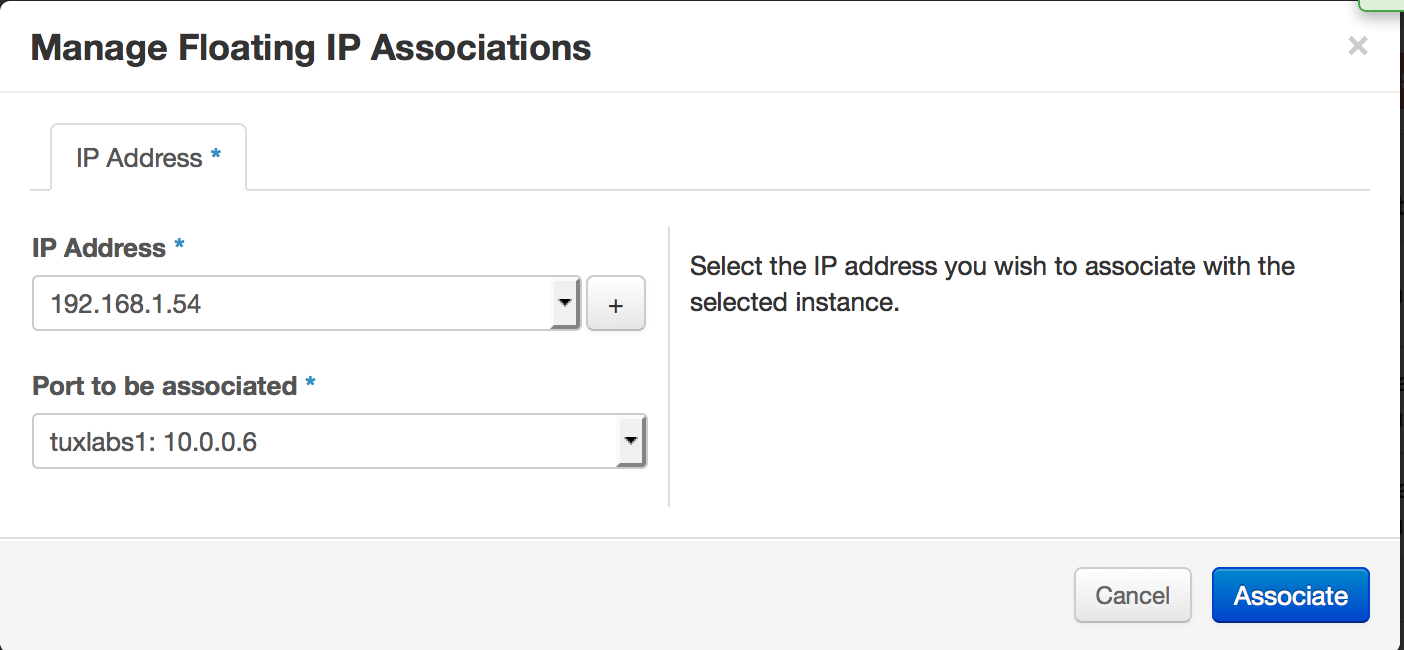
And then click associate…

Now you should see your VM has an internal IP (a 10 dot address) and an External IP on the 192.168.1.0/24 network. Now we can SSH to our VM.
We didn’t mention it earlier, but Openstack comes with only one Linux image by default, it’s called CirrOS and it’s just a tiny-minimal cloud image for testing. The login to this operating system is cirros / cubswin:) … which is visible from the console log of the machine once fully booted. Now you could SSH into the machine on 192.168.1.54 using that login and password like so…
[root@diamond tuxninja]# ssh cirros@192.168.1.54
The authenticity of host '192.168.1.54 (192.168.1.54)' can't be established.
RSA key fingerprint is d1:19:89:1d:f0:4b:20:27:a3:7c:99:0d:75:fe:d0:35.
Are you sure you want to continue connecting (yes/no)? yes
Warning: Permanently added '192.168.1.54' (RSA) to the list of known hosts.
cirros@192.168.1.54's password:
$
But that is lame ! We imported our SSH key remember ? So how do we use that ? Like this..
[root@diamond tuxninja]# ssh -i cloud.key cirros@192.168.1.54
$
Wow, that is cool.
Now what ? Let’s add some more images.
Installing More Operating System Images
Ok, Openstack is installed, Networking is working, Metadata service and our keys are working, we are happy campers, but to make this Cloud useful we are going to need some real Linux images. There is two ways to install images using glance (the openstack image service).
In the first method we download the image using wget & then we run the proper glance command. Here is this approach in action.
Don’t forget to source the rc file if you have not already
[root@diamond ~]# source keystonerc_admin
[root@diamond ~(keystone_admin)]# wget http://download.fedoraproject.org/pub/fedora/linux/updates/20/Images/x86_64/Fedora-x86_64-20-20140407-sda.qcow2
[root@diamond ~(keystone_admin)]# glance image-create --name='Fedora 6.4' --is-public=true \ --container-format=bare --disk-format=qcow2 < Fedora-x86_64-20-20140407-sda.qcow2
Alternatively, we could do the same thing in one command !
[root@diamond ~(keystone_admin)]# glance image-create --name ubuntu-server-12.04 --is-public true --container-format bare --disk-format qcow2 --copy-from http://cloud-images.ubuntu.com/precise/current/precise-server-cloudimg-amd64-disk1.img
Remember whenever you run openstack commands you are going the status or result set back from the command.
Once you have installed the Fedora and Ubuntu images you should have a real cloud on your hands. Now you can do things like expand your setup for multi-node or get LBaaS working for load balancing requests to your web servers for example. Or if you want to be amazeballs you could install things like Puppet inside of Docker, or Cloud Foundry and build your PaaS (Platform As A Service)!
Final Comments
Openstack can be tricky even for an experienced Sys Admin. While learning Openstack I found it difficult to find tutorials on exactly the setup I was looking for mainly in terms of how the network was being configured, and this often made me second guess myself when I would run into an issue as I learned Openstack. I wanted to write this article to give back and help to educate my brothers and students of life long learning as you embark on your Openstack adventure, Godspeed. Here are some commands of note to help you along your way.
How to launch a VM from command line
[root@diamond ~(keystone_admin)]# nova boot --flavor m1.small --image 'Fedora 6.4' --security-groups default --key-name openstack --nic net-id=975a58eb-d3cb-4c5b-956b-ed1bdb0820d2 fed1
How to run command on a network namespace (VM Instance)
[root@diamond tuxninja]# ip netns exec qrouter-71064321-eb87-4d28-85ee-05f6ddc75968 iptables -L -t nat | grep 169
REDIRECT tcp -- anywhere= 169.254.169.254 tcp dpt:http redir ports 9697
[root@diamond tuxninja]# ip netns exec `ip netns list | grep qrouter` netstat -anpt
How to restart only neutron services
[root@diamond tuxninja]# cd /etc/init.d/; for i in $(ls -1 neutron-* | cut -d \. -f 1); do sudo service $i restart; done
Or a simpler method would be…
[root@diamond tuxninja]# openstack-service restart neutron
Stopping neutron-dhcp-agent: [FAILED]
Starting neutron-dhcp-agent: [  OK  ]
Stopping neutron-l3-agent: [  OK  ]
Starting neutron-l3-agent: [  OK  ]
Stopping neutron-metadata-agent: [  OK  ]
Starting neutron-metadata-agent: [  OK  ]
Stopping neutron-openvswitch-agent: [  OK  ]
Starting neutron-openvswitch-agent: [  OK  ]
Stopping neutron: [  OK  ]
Starting neutron: [  OK  ]
[root@diamond tuxninja]#
How to add an account / change a password using cloud-init
Stick this under Post Creation Customized Script to
#cloud-config
password: mysecret
chpasswd: { expire: False }
ssh_pwauth: True
How to edit the password file of an image
[root@diamond tuxninja]# guestfish -a disk.img -i vi /etc/passwd
How to see the status of openstack services
[root@diamond tuxninja]# openstack-status
How to check your log files for more clues
you can do this for every openstack service, but below I am just showing the two most popular to troubleshoot for getting your cloud up and going, nova and neutron aka controller, compute and networking logs.
[root@diamond tuxninja]# tail /var/log/nova/*.log
[root@diamond tuxninja]# tail /var/log/neutron/*.log
Want to change which partition Openstack uses on local disk (ephemeral storage) to deploy VM’s ?
If the majority of your ephemeral (local) disk is under a different partition other than /var… For example, mine was under /home, then you need to change your state path and restart openstack services. Don’t forget to copy any existing files in /var/lib/nova/ to the new location.
[root@diamond ~(keystone_admin)]# grep state_path /etc/nova/nova.conf | grep -v '#' | grep -v ^$
state_path=/home/openstack/var/lib/nova
[root@diamond ~(keystone_admin)]#
Checking your openvswitch configuration
[root@diamond ~(keystone_admin)]# ovs-vsctl show
ee001583-903b-4397-8805-40c18b528d2c
    Bridge br-int
        Port "qvo0cadc326-6b"
            tag: 3
            Interface "qvo0cadc326-6b"
        Port "tap86f8ac73-41"
            tag: 3
            Interface "tap86f8ac73-41"
                type: internal
        Port "qr-11baa878-fb"
            tag: 3
            Interface "qr-11baa878-fb"
                type: internal
        Port patch-tun
            Interface patch-tun
                type: patch
                options: {peer=patch-int}
        Port br-int
            Interface br-int
                type: internal
        Port "qvo6673d677-ed"
            tag: 3
            Interface "qvo6673d677-ed"
        Port "qvoc8a2b994-a1"
            tag: 3
            Interface "qvoc8a2b994-a1"
    Bridge br-ex
        Port br-ex
            Interface br-ex
                type: internal
        Port "eth0"
            Interface "eth0"
        Port "qg-82e238cc-3d"
            Interface "qg-82e238cc-3d"
                type: internal
    ovs_version: "1.11.0"
[root@diamond ~(keystone_admin)]#
The Final Gem
The Most Popular Issue I ran Into When Installing Openstack
Looks like this in the console..
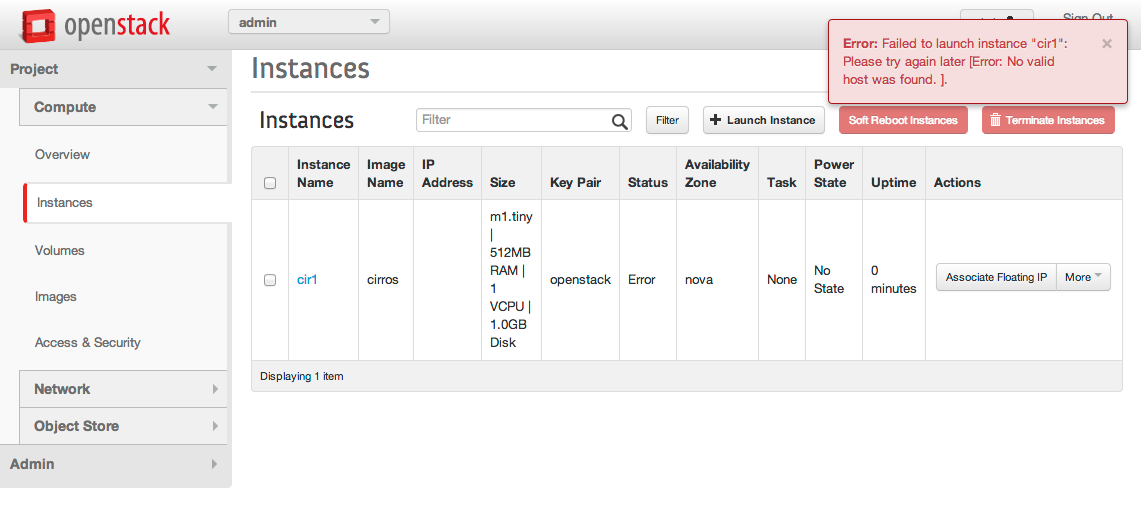
This is the generic error for I didn’t have resources to create the VM, which can happen for a multitude of reasons…Like for example, the Openvswitch-agent not running.
[root@diamond metadata]# openstack-status
...
neutron-openvswitch-agent:              dead
But why is Openvswitch Agent Failing ?
[root@diamond metadata]# tail /var/log/neutron/openvswitch-agent.log
2014-07-27 12:47:31.072 17288 TRACE neutron   File "/usr/bin/neutron-openvswitch-agent", line 10, in <module>
2014-07-27 12:47:31.072 17288 TRACE neutron     sys.exit(main())
2014-07-27 12:47:31.072 17288 TRACE neutron   File "/usr/lib/python2.6/site-packages/neutron/plugins/openvswitch/agent/ovs_neutron_agent.py", line 1394, in main
2014-07-27 12:47:31.072 17288 TRACE neutron     agent = OVSNeutronAgent(**agent_config)
2014-07-27 12:47:31.072 17288 TRACE neutron   File "/usr/lib/python2.6/site-packages/neutron/plugins/openvswitch/agent/ovs_neutron_agent.py", line 216, in __init__
2014-07-27 12:47:31.072 17288 TRACE neutron     self.setup_tunnel_br(tun_br)
2014-07-27 12:47:31.072 17288 TRACE neutron   File "/usr/lib/python2.6/site-packages/neutron/plugins/openvswitch/agent/ovs_neutron_agent.py", line 707, in setup_tunnel_br
2014-07-27 12:47:31.072 17288 TRACE neutron     if int(self.patch_tun_ofport) < 0 or int(self.patch_int_ofport) < 0:
2014-07-27 12:47:31.072 17288 TRACE neutron TypeError: int() argument must be a string or a number, not 'NoneType'
2014-07-27 12:47:31.072 17288 TRACE neutron
Additionally, I have seen different errors presented referencing vif.py
The fix for this could be multiple different things. What you should do first is verify your network interfaces are configured 100% correctly. Compare your ovs-vsctl output to mine above… Look different ? Shorter, stuff is missing ? Ok this error usually means Openstack is having difficulty inserting port’s into Openvswitch for whatever reason. What I found is the most common error is that you did not restart networking, before restarting openstack networking after making a configuration change to the interfaces. So to resolve this try…
[root@diamond metadata]# /etc/init.d/network restart
Shutting down interface br-ex:                             [  OK  ]
Shutting down interface br-int:                            [  OK  ]
Shutting down interface br-tun:                            [  OK  ]
Shutting down interface eth0:                              [  OK  ]
Shutting down interface eth1:                              [  OK  ]
Shutting down loopback interface:                          [  OK  ]
Bringing up loopback interface:                            [  OK  ]
Bringing up interface br-ex:  Determining if ip address 192.168.1.10 is already in use for device br-ex...
                                                           [  OK  ]
Bringing up interface br-int:                              [  OK  ]
Bringing up interface br-tun:                              [  OK  ]
Bringing up interface eth0:  RTNETLINK answers: File exists
                                                           [  OK  ]
Bringing up interface eth1:  Determining if ip address 10.0.0.1 is already in use for device eth1...
                                                           [  OK  ]
[root@diamond metadata]# openstack-service --full-restart

Stopping openstack-ceilometer-alarm-evaluator:             [  OK  ]
Starting openstack-ceilometer-alarm-evaluator:             [  OK  ]
Stopping openstack-ceilometer-alarm-notifier:              [  OK  ]
Starting openstack-ceilometer-alarm-notifier:              [  OK  ]
Stopping openstack-ceilometer-api:                         [  OK  ]
Starting openstack-ceilometer-api:                         [  OK  ]
Stopping openstack-ceilometer-central:                     [  OK  ]
Starting openstack-ceilometer-central:                     [  OK  ]
Stopping openstack-ceilometer-collector:                   [  OK  ]
Starting openstack-ceilometer-collector:                   [  OK  ]
Stopping openstack-ceilometer-compute:                     [  OK  ]
Starting openstack-ceilometer-compute:                     [  OK  ]
Stopping openstack-ceilometer-agent-notification:          [  OK  ]
Starting openstack-ceilometer-agent-notification:          [  OK  ]
Stopping openstack-cinder-api:                             [  OK  ]
Starting openstack-cinder-api:                             [  OK  ]
Stopping openstack-cinder-backup:                          [  OK  ]
Starting openstack-cinder-backup:                          [  OK  ]
Stopping openstack-cinder-scheduler:                       [  OK  ]
Starting openstack-cinder-scheduler:                       [  OK  ]
Stopping openstack-cinder-volume:                          [  OK  ]
Starting openstack-cinder-volume:                          [  OK  ]
Stopping openstack-glance-api:                             [  OK  ]
Starting openstack-glance-api:                             [  OK  ]
Stopping openstack-glance-registry:                        [  OK  ]
Starting openstack-glance-registry:                        [  OK  ]
Stopping openstack-glance-scrubber:                        [  OK  ]
Starting openstack-glance-scrubber:                        [  OK  ]
Stopping keystone:                                         [  OK  ]
Starting keystone:                                         [  OK  ]
Stopping openstack-nova-api:                               [  OK  ]
Starting openstack-nova-api:                               [  OK  ]
Stopping openstack-nova-cert:                              [  OK  ]
Starting openstack-nova-cert:                              [  OK  ]
Stopping openstack-nova-compute:                           [  OK  ]
Starting openstack-nova-compute:                           [  OK  ]
Stopping openstack-nova-conductor:                         [  OK  ]
Starting openstack-nova-conductor:                         [  OK  ]
Stopping openstack-nova-console:                           [  OK  ]
Starting openstack-nova-console:                           [  OK  ]
Stopping openstack-nova-consoleauth:                       [  OK  ]
Starting openstack-nova-consoleauth:                       [  OK  ]
Stopping openstack-nova-metadata-api:                      [FAILED]
Starting openstack-nova-metadata-api:                      [  OK  ]
Stopping openstack-nova-novncproxy:                        [  OK  ]
Starting openstack-nova-novncproxy:                        [  OK  ]
Stopping openstack-nova-scheduler:                         [  OK  ]
Starting openstack-nova-scheduler:                         [  OK  ]
Stopping openstack-nova-spicehtml5proxy:                   [FAILED]
Starting openstack-nova-spicehtml5proxy:                   [  OK  ]
Stopping openstack-nova-xvpvncproxy:                       [  OK  ]
Starting openstack-nova-xvpvncproxy:                       [  OK  ]
Stopping openstack-swift-account:                          [  OK  ]
Starting openstack-swift-account:                          [  OK  ]
Stopping openstack-swift-account-auditor:                  [  OK  ]
Starting openstack-swift-account-auditor:                  [  OK  ]
Stopping openstack-swift-account-reaper:                   [  OK  ]
Starting openstack-swift-account-reaper:                   [  OK  ]
Stopping openstack-swift-account-replicator:               [  OK  ]
Starting openstack-swift-account-replicator:               [  OK  ]
Stopping openstack-swift-container:                        [  OK  ]
Starting openstack-swift-container:                        [  OK  ]
Stopping openstack-swift-container-auditor:                [  OK  ]
Starting openstack-swift-container-auditor:                [  OK  ]
Stopping openstack-swift-container-replicator:             [  OK  ]
Starting openstack-swift-container-replicator:             [  OK  ]
Stopping openstack-swift-container-updater:                [  OK  ]
Starting openstack-swift-container-updater:                [  OK  ]
Stopping openstack-swift-object:                           [  OK  ]
Starting openstack-swift-object:                           [  OK  ]
Stopping openstack-swift-object-auditor:                   [  OK  ]
Starting openstack-swift-object-auditor:                   [  OK  ]
Stopping openstack-swift-object-expirer:                   [  OK  ]
Starting openstack-swift-object-expirer:                   [  OK  ]
Stopping openstack-swift-object-replicator:                [  OK  ]
Starting openstack-swift-object-replicator:                [  OK  ]
Stopping openstack-swift-object-updater:                   [  OK  ]
Starting openstack-swift-object-updater:                   [  OK  ]
Stopping openstack-swift-proxy:                            [  OK  ]
Starting openstack-swift-proxy:                            [  OK  ]
Stopping neutron-dhcp-agent:                               [  OK  ]
Starting neutron-dhcp-agent:                               [  OK  ]
Stopping neutron-l3-agent:                                 [  OK  ]
Starting neutron-l3-agent:                                 [  OK  ]
Stopping neutron-lbaas-agent:                              [FAILED]
Starting neutron-lbaas-agent:                              [  OK  ]
Stopping neutron-metadata-agent:                           [  OK  ]
Starting neutron-metadata-agent:                           [  OK  ]
Stopping neutron-openvswitch-agent:                        [FAILED]
Starting neutron-openvswitch-agent:                        [  OK  ]
Stopping neutron-openvswitch-agent:                        [  OK  ]
Starting neutron-openvswitch-agent:                        [  OK  ]
Stopping neutron:                                          [  OK  ]
Starting neutron:                                          [  OK  ]
[root@diamond metadata]#
Now when we run openstack-status the openvswitch-agent should be running !
[root@diamond metadata]# openstack-status
...
neutron-openvswitch-agent:              active


[root@diamond metadata]# tail /var/log/neutron/openvswitch-agent.log
2014-07-27 12:50:13.793 24985 INFO neutron.plugins.openvswitch.agent.ovs_neutron_agent [req-f9d72adc-3043-4c3e-a24c-fc32bfa1d835 None] Agent initialized successfully, now running...
2014-07-27 12:50:13.800 24985 INFO neutron.plugins.openvswitch.agent.ovs_neutron_agent [req-f9d72adc-3043-4c3e-a24c-fc32bfa1d835 None] Agent out of sync with plugin!
2014-07-27 12:50:13.801 24985 INFO neutron.plugins.openvswitch.agent.ovs_neutron_agent [req-f9d72adc-3043-4c3e-a24c-fc32bfa1d835 None] Agent tunnel out of sync with plugin!
2014-07-27 12:50:13.851 24985 INFO neutron.openstack.common.rpc.common [req-f9d72adc-3043-4c3e-a24c-fc32bfa1d835 None] Connected to AMQP server on 192.168.1.10:5672
2014-07-27 12:50:14.329 24985 INFO neutron.agent.securitygroups_rpc [-] Preparing filters for devices set([u'e44457a8-c88a-4a3a-818a-c96c75e16979'])
2014-07-27 12:50:15.023 24985 WARNING neutron.plugins.openvswitch.agent.ovs_neutron_agent [-] Device e44457a8-c88a-4a3a-818a-c96c75e16979 not defined on plugin
2014-07-27 12:50:18.119 24985 INFO neutron.agent.securitygroups_rpc [-] Preparing filters for devices set([u'9cdf8669-9e09-48bb-873e-84cfad27993f'])
2014-07-27 12:50:18.812 24985 INFO neutron.plugins.openvswitch.agent.ovs_neutron_agent [-] Port 9cdf8669-9e09-48bb-873e-84cfad27993f updated. Details: {u'admin_state_up': True, u'network_id': u'975a58eb-d3cb-4c5b-956b-ed1bdb0820d2', u'segmentation_id': 10, u'physical_network': None, u'device': u'9cdf8669-9e09-48bb-873e-84cfad27993f', u'port_id': u'9cdf8669-9e09-48bb-873e-84cfad27993f', u'network_type': u'vxlan'}
2014-07-27 12:50:18.812 24985 INFO neutron.plugins.openvswitch.agent.ovs_neutron_agent [-] Assigning 1 as local vlan for net-id=975a58eb-d3cb-4c5b-956b-ed1bdb0820d2
2014-07-27 12:50:19.205 24985 INFO neutron.plugins.openvswitch.agent.ovs_neutron_agent [-] Configuration for device 9cdf8669-9e09-48bb-873e-84cfad27993f completed.
[root@diamond metadata]#
And Healthy ! Awesome. Last, but not least you can find all my blessed configs for this article as well as a script I wrote to snapshot those configs on my github. Thanks for learning with me.