tuxninja

Tuxninja aka Jason Riedel has worked as a Systems & Network Administrator and Code Hacker since 1999. Since 2005 he has worked for PayPal with a focus on Operations Architecture. He is also CEO of Tuxlabs LLC where he dedicates his time to the experimentation and close study of new technologies and programming languages.

Python & The Jira Rest API

Recently, while having to work a lot more in Jira than normal I got annoyed with the Jira Web GUI. So I wrote a script to do simple management of our jira issues.

Here is the basic usage

(env) ➜  jira git:(master) ✗ ./jira-ctl.py
usage: jira-ctl.py [-h] [-lp] [-li LIST_PROJECT_ISSUES] [-ua UPDATE_ASSIGNEE]
                   [-ud UPDATE_DATE] [-usts UPDATE_STATUS]
                   [-usum UPDATE_SUMMARY]

optional arguments:
  -h, --help            show this help message and exit
  -lp, --list-projects  List all projects
  -li LIST_PROJECT_ISSUES, --list-issues LIST_PROJECT_ISSUES
                        List Issues for a specific project
  -ua UPDATE_ASSIGNEE, --update-assignee UPDATE_ASSIGNEE
                        Update an issues assignee format: <issue
                        number>,<first_last>
  -ud UPDATE_DATE, --update-date UPDATE_DATE
                        Update an issues due date format: <issue number
                        >,<yyyy-mm-dd>
  -usts UPDATE_STATUS, --update-status UPDATE_STATUS
                        Update an issues status format: <issue
                        number>,'<Open|In Progress|Resolved>'
  -usum UPDATE_SUMMARY, --update-summary UPDATE_SUMMARY
                        Update an issues summary format: <issue
                        number>,'<summary>'
(env) ➜  jira git:(master) ✗

Here is the code…

from jira.client import JIRA
import os, sys
import prettytable
import argparse

parser = argparse.ArgumentParser()
parser.add_argument('-lp', '--list-projects', action="store_true", dest="list_projects", required=False, help="List all projects")
parser.add_argument('-li', '--list-issues', action="store", dest="list_project_issues", required=False, help="List Issues for a specific project")
parser.add_argument('-ua', '--update-assignee', action="store", dest="update_assignee", required=False, help="Update an issues assignee format: <issue number>,<first_last>")
parser.add_argument('-ud', '--update-date', action="store", dest="update_date", required=False, help="Update an issues due date format: <issue number>,<yyyy-mm-dd>")
parser.add_argument('-usts', '--update-status', action="store", dest="update_status", required=False, help="Update an issues status format: <issue number>,'<Open|In Progress|Resolved>'")
parser.add_argument('-usum', '--update-summary', action="store", dest="update_summary", required=False, help="Update an issues summary format: <issue number>,'<summary>'")
args = parser.parse_args()

def get_pass():
    if os.environ.get('JIRA_PASS') == None:
        print "you must first export your JIRA_PASS in the shell by running: source getpass.sh"
        print 'or "export JIRA_PASS=<jira_password>'
        sys.exit()
    jira_password = str(os.environ['JIRA_PASS'])

    return jira_password

def connect_jira(jira_server, jira_user, jira_password):
    '''
    Connect to JIRA. Return None on error
    '''
    try:
        #print "Connecting to JIRA: %s" % jira_server
        jira_options = {'server': jira_server}
        jira = JIRA(options=jira_options,
                    # Note the tuple
                    basic_auth=(jira_user,
                                jira_password))
        return jira
    except Exception,e:
        print "Failed to connect to JIRA: %s" % e
        return None

def list_projects():
    projects = jira.projects()
    header = ["Projects"]
    table = prettytable.PrettyTable(header)
    for project in projects:
        row = [str(project)]
        table.add_row(row)
    print table

def list_project_issues(project):
    query = 'project = %s and status != Resolved order by due asc' % (project)
    #query = 'project = %s and status != Resolved order by due desc' % (project)
    #query = 'project = %s order by due desc' % (project)
    issues = jira.search_issues(query, maxResults=100)

    if issues:
        header = ["Ticket", "Summary", "Assignee", "Status", "Due Date"]
        table = prettytable.PrettyTable(header)

        for issue in issues:
                summary = issue.fields.summary
                st = str(issue.fields.status)
                dd = issue.fields.duedate
                assignee = issue.fields.assignee
                row = [issue, summary, assignee, st, dd]
                table.add_row(row)
        print table

def update_issue_assignee(issue_number, assignee):
    issue = jira.issue(issue_number)
    issue.update(assignee=assignee)
    print "updated %s with new Assignee: %s" % (issue_number, assignee)

def update_issue_duedate(issue_number, dd):
    issue = jira.issue(issue_number)
    issue.update(duedate=dd)
    print "updated %s with new Due Date: %s" % (issue_number, dd)

def update_issue_summary(issue_number, summary):
    issue = jira.issue(issue_number)
    issue.update(summary=summary)
    print "updated %s with new Summary: %s" % (issue_number, summary)

def update_issue_status(issue_number, status):
    # To figure out transitions view the following URL
    # https://jira.yourcompany.com/rest/api/2/issue/XXXXXX-22/transitions?expand=transitions.fields

    transitions = {
                    'Resolved': 11,
                    'Open': 41,
                    'In Progress': 21,
                    'Testing': 71,
                    'Transition': 81,
                    'Closed': 91,
    }

    issue = jira.issue(issue_number)
    jira.transition_issue(issue, transitions[status])
    print "updated %s with new Status: %s" % (issue_number, status)

if __name__ == "__main__":
    if not args:
        parser.print_help()
    else:
        jira_user = '<your_login>'
        jira_password = get_pass()
        jira_server = 'https://jira.yourcompany.com'

        jira = connect_jira(jira_server, jira_user, jira_password)

        if args.list_projects:
            list_projects()
        elif args.list_project_issues:
            project = args.list_project_issues
            list_project_issues(project)
        elif args.update_assignee:
            (issue_number, assignee) = args.update_assignee.split(',')
            update_issue_assignee(issue_number, assignee)
        elif args.update_date:
            (issue_number, dd) = args.update_date.split(',')
            update_issue_duedate(issue_number, dd)
        elif args.update_status:
            (issue_number, status) = args.update_status.split(',')
            update_issue_status(issue_number, status)
        elif args.update_summary:
            (issue_number, summary) = args.update_summary.split(',')
            update_issue_summary(issue_number, summary)
        else:
            parser.print_help()

Later, I found out that there is a Jira command line utility, I didn’t check and see what functionality it provided, but I enjoyed writing this anyway.

Happy coding !

Python & The Jira Rest API Read More »

How To: Maximize Availability Effeciently Using AWS Availability Zones

For the TL;DR version, skip straight to the Cassandra Examples

Intro & Background

During my years at PayPal I was fortunate enough to be a part of a pioneering architecture & engineering team that designed & delivered  a new paradigm for how we deployed & operated applications using a model that included 5 Availability Zones per Region (multiple regions) & Global Traffic Management. This new deployment pattern increased our cost efficiency and capacity while providing high availability to our production application stack. The key to increasing cost efficiency while not losing availability is how you manage your capacity. Failure detection and global traffic management go the rest of the way to make use of all your Availability Zones & Regions giving you better availability. There is a little more to it, in terms of how you deploy your applications advantageously to this design…but we will get into that with our Cassandra/AWS examples later.

Prior to this model our approach was the traditional 3 datacenter model. 2 Active + 1 DR all with 100% of the capacity required to operate independently and they required manual failover in the event of an outage.

Oh the joys of operating your own private cloud & datacenters at scale 🙂

Most companies and a recent article suggests PayPal as well, are thinking about or are moving to public cloud. Public cloud gives most companies cheaper and faster access to the economy of scale as well as an immediate tap into a global infrastructure.

Amazon Web Services (AWS) is the market share leader in public cloud today. They operate tens of Regions & Availability Zones all around the world. Deploying your application(s) on these massive scale public clouds means opportunity for operating them in more efficient ways.

Recently I came across a few articles that felt like reading a history book on going from a Failover to an Always On model.  I’ll just leave these here for inquiring minds…

http://highscalability.com/blog/2016/8/23/the-always-on-architecture-moving-beyond-legacy-disaster-rec.html
https://static.googleusercontent.com/media/research.google.com/en//pubs/archive/44686.pdf

Ok enough with the introduction, lets move into the future, starting with the Principles of High Availability.

Principles for High Availability – Always

  • Use Multiple Regions ( Min 2, Max as many as you need) 
  • Use Multiple Availability Zones ( Min 2, Max as many as is prudent to optimize availability and capacity with cost ) 
  • Design for an Active/Active architecture
  • Deploy at least N+1 capacity per cluster when Active/Active is not easily accomplished
    • Note: N=100% of capacity required to run your workload
  • Eliminate Single Points of Failure/Ensure redundancies in all components of the distributed system(s)
  • Make services fault tolerate/Ensure they continue in the event of various failures
  • Make services resilient by implementing timeout/retry patterns (circuit breaker, exponential back off algorithm etc)
  • Make services implement graceful failure such as degrading the quality of a response while still providing a response
  • Use an ESB (Enterprise Service Bus) to make calls to your application stack asynchronous where applicable
  • Use caching layers to speed up responses
  • Use Auto-Scaling for adding dynamic capacity for bursty workloads (This can also save money)
  • Design deployments to be easily reproduced & self-healing (i.e. using Spinnaker(Netflix), Kubernetes (Google) for containers, Scalr etc)
  • Design deployments with effective monitoring visibility –  Synthetic Transactions, Predictive Analytics, event triggers, etc.

Principles for High Availability – Never’s

  • Deploy to a single availability zone
  • Deploy to a single region
  • Depend on either a single availability zone or region to always be UP.
  • Depend on capacity in a single availability zone in a region to be AVAILABLE.
  • Give up too easily on an Active/Active design/implementation
  • Rely on datacenter failover to provide HA (Instead prefer active/active/multi-region/multi-az)
  • Make synchronous calls across regions (this negatively effects your failure domain cross region)
  • Use sticky load balancing to pin requests to a specific node for a response to succeed (i.e. if you are relying on it for ‘state’ purposes this is really bad)

Summarizing

  • YOU MUST deploy your application components to a minimum of 2 Regions.
  • Because failures of an entire region in AWS happen frequently…
  • YOU MUST deploy your application components to a minimum of 2 Availability Zones within a Region. 
  • Because an AWS AZ can go down for maintenance, outage or be out of new capacity frequently…
  • YOU MUST aim to maximize the use of Availability Zones and Regions, but balance that with cost requirements and be aware of diminishing returns
  • YOU MUST use global traffic routing (Route53) and health-check monitoring/ automated markdowns to route around failure to healthy deployments
  • YOU MUST follow the rest of the Principles of High Availability Always directives to the best of your ability

Active/Active Request Routing (AWS)

Diagram Components

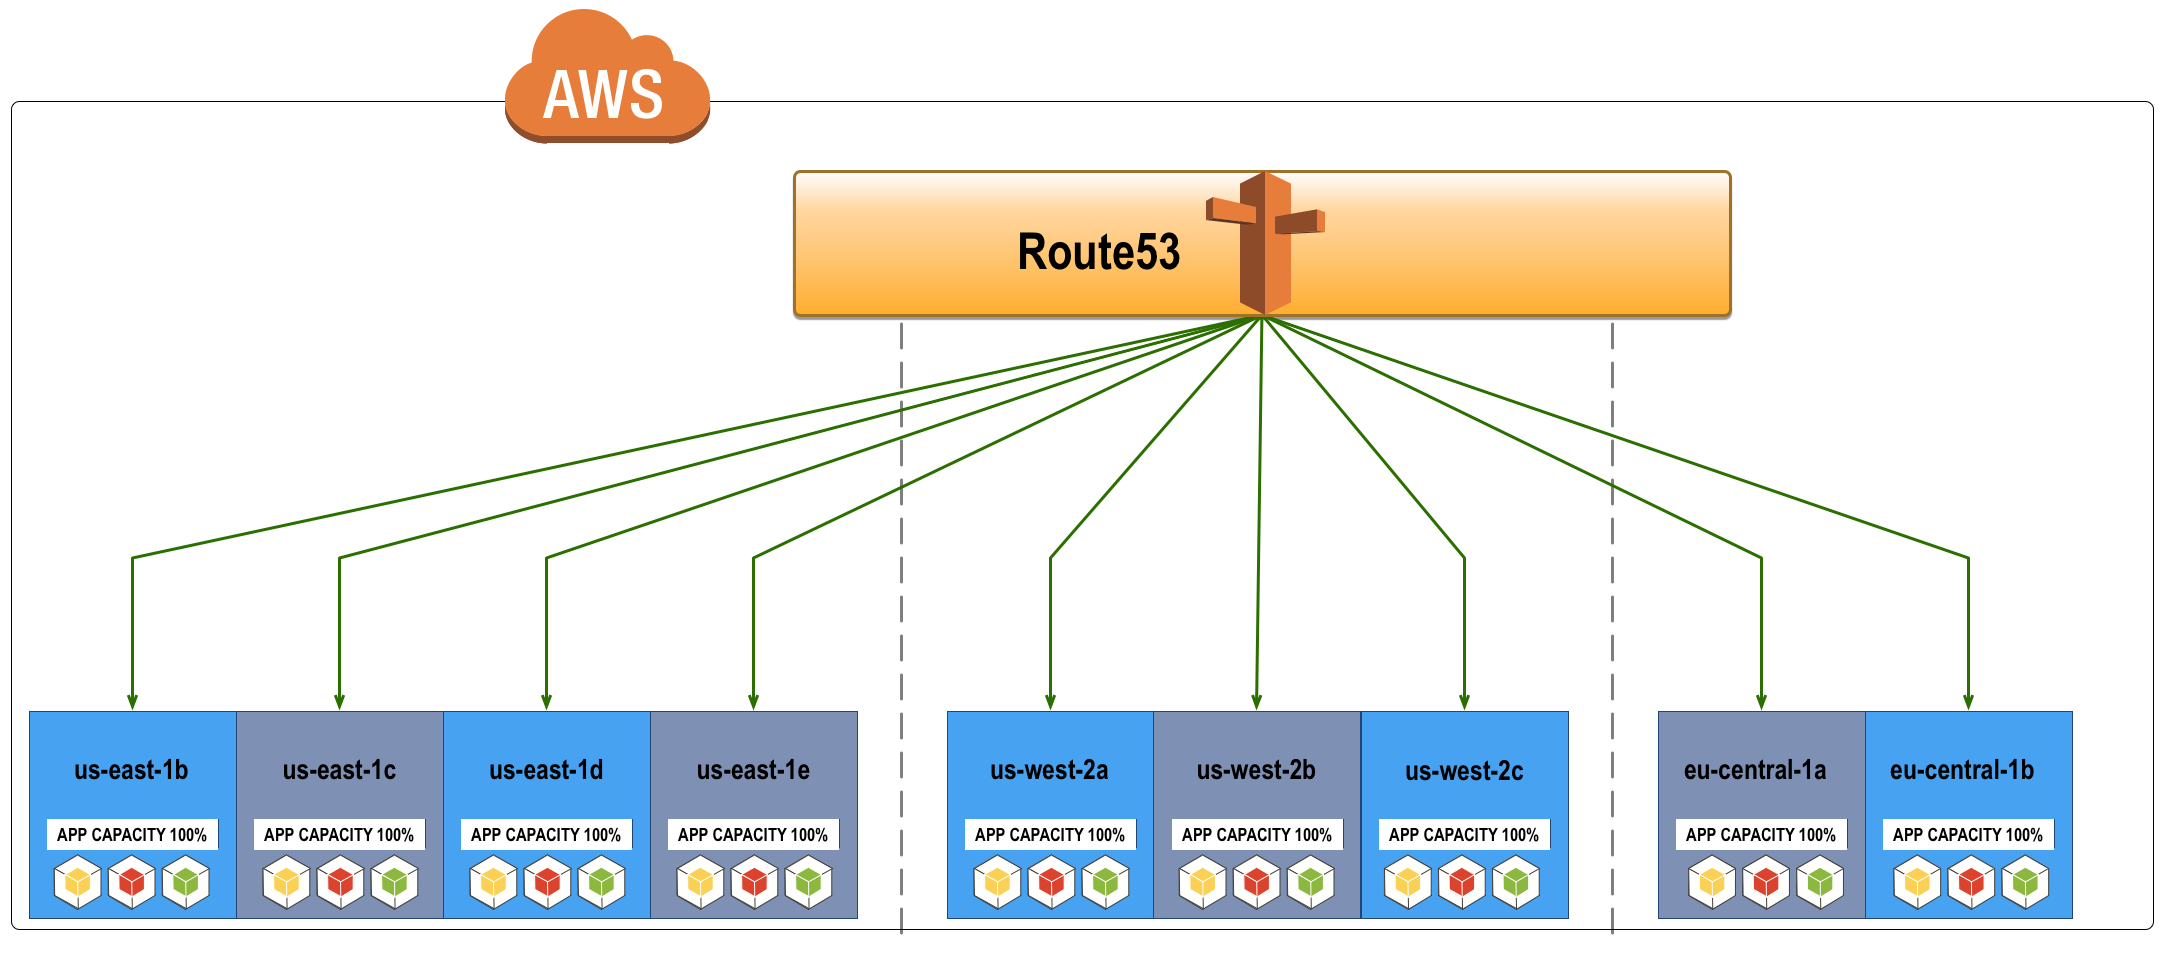
  • Global Traffic Management: Using AWS Route53 as a Global Traffic Manager (configuring Traffic Flows + geolocation)
  • 3 Regions = AZ’s: us-east-1 = 4, us-west-2 = 3, eu-central-1 = 2

Additional Info on Active/Active Request Routing

  • Route53 load balances requests to the application stack within each availability zone and across 3 regions.
  • This is an Active/Active design, i.e. Route53 is configured to route requests to all available zones until one fails. (Traffic Flow + Geolocation)

The Design Above Is Actually Wasteful (Cost & Capacity must be optimized for HA)

  • This example shows all application deployments (& components) in every AZ deployed with 100% capacity required to run without another AZ
  • This means you could lose ALL, BUT ONE availability zone and still service requests from your one remaining AZ

While this would achieve the highest availability, it is not the most optimal approach because it is wasteful

  • Each application team must decide the right mix of regions, availability zones & capacity to provide HA at the lowest cost for their consumers based on their application requirements
  • Depending on how much capacity you deploy for your application per AZ it is possible to deploy too much/many and have diminishing returns on availability while wasting a lot of $$$
  • You must find the right balance for your application & business contexts ( see below examples with Cassandra for more details on how this approach can be wasteful )

Understanding Availability Zones

The crux of achieving a highly available architecture lies within the proper usage & understanding of Availability Zones. If you ignore everything else, read this section !

What Do AZ’z Provide ?

In Amazon’s own words: 

“Each region contains multiple distinct locations called Availability Zones, or AZs. Each Availability Zone is engineered to be isolated from failures in other Availability Zones, and to provide inexpensive, low-latency network connectivity to other zones in the same region. By launching instances in separate Availability Zones, you can protect your applications from the failure of a single location.” Source: http://docs.aws.amazon.com/AmazonRDS/latest/UserGuide/Concepts.RegionsAndAvailabilityZones.html

How to think of an AZ

  • In the AWS World it is helpful to use the analogy of an Availability Zone being a Rack in a traditional datacenter
  • I.E. instead of striping a Cassandra cluster across Racks, you would do it across Availability Zones.

What about using an Availability Zone as a complete application failure domain ?

  • In a traditional private datacenter an Availability Zone is a separate datacenter container, with shared network (although it can be isolated as well).
  • It is built/populated with the required infrastructure & capacity to run the applications and it has all the physical characteristics mentioned above that the AWS AZ has
  • However, the way it is used in a private datacenter can be different, because YOU have full visibility & control of capacity
  • For example, you could limit service calls such that service calls are to/from the same AZ, effectively creating a distinct application failure domain, piggy-backing the already distinct infrastructure failure domain (provided by an Availability Zone)

Why not use an AWS Availability Zone as a distinct application failure domain then ?

  • You can, but this fails to be robust in the public cloud context because capacity might not always be available in the AZ and you don’t know when it will run out
  • BEING CLEAR – You can run out of capacity in an Availability Zone FOREVER. The AZ will still be available to manage existing infrastructure/capacity, but new capacity cannot be added
  • This would negatively effect auto-scaling & new provisioning and ultimately implies you cannot rely on a single AZ to be treated as a datacenter container
  • To continue operating when an AZ runs out of capacity in public cloud you have to utilize a new AZ for new capacity
  • That new AZ would follow the same isolated service calls principles except now 2 AZ’s would be called as part of a failure domain
  • Effectively multiple AZ’s would become a single failure domain organically
  • Therefore, it is not advantageous in the public cloud world to try to treat a single AZ as a failure domain
  • Instead stripe applications across as many AZ’s as necessary to provide up to N+2 capacity per Region while minimizing waste.
  • The region becomes the failure domain of your application and this is a more efficient use of AZs to provide availability in the public cloud context
  • This is why N+N regions is paramount in managing your availability in public cloud

What is the latency between Availability Zones ?

  • Tests with micro instances (they have worst network profile) show that the latency between AZ’s within a region is on average 1ms
  • Most workloads will have no challenge dealing with 1ms latency and taking full advantage of availability zones to augment their availability
  • However, some applications are very chatty, making hundreds to thousands of calls in series
  • These workloads often must be re-architected to work well in a public cloud environment

What happens if I do not use multiple Availability Zones ?

Truths…

  • An Availability Zone can become unavailable at any time, for any reason
  • An Availability Zone can become unavailable due to planned maintenance or an outage
  • An Availability Zone can run out of capacity for long periods of time and indefinitely (forever)

Thus the result of not deploying to multiple availability zones is…

  • Provisioning outages for new capacity and the inability to self-heal deployments

The reality is… 

  • If you only deploy to a single AZ in a Region, you guarantee that you will experience a 100% failure in that Region, when the AZ you rely on becomes unavailable
  • You can failover or continue (if Active/Active) to service transactions in another Region, but you can achieve higher availability per Region by striping your application deployment across multiple AZ’s in a region
  • And you have less latency to deal with when failing over to another AZ locally vs. an AZ in a remote region

Finding The Right Balance Between High Availability & Cost

Often times availability decisions come with a cost. This section will describe a more practical and better way to achieve high availability infrastructure for your application while keeping the costs within reason. It is important to note, cost optimization heavily depends on application context, because you must first figure out the lowest common denominator of AZ’s / Regions you can use and still achieve your target availability. This typically depends on the number of required AZ’s to achieve quorum for stateful services. For example, if we were configuring Cassandra for eventual consistency + high availability, we would want 5 nodes in the cluster and a replication factor of 3. We would want to the best of our ability to spread those nodes across AZ’s.

100% of application capacity deployed to every Availability Zone is bad

  • The traffic routing example in the beginning shows 100% capacity being deployed for every application component in every AZ
  • As covered previously and shown in the later sections, this is a sub-optimal deployment strategy.
  • Instead you must stripe your applications capacity across AZ’s, keeping in mind a target of at least N+1 capacity or N+2 where possible

What if I deploy 100% of application capacity to only two of Availability Zones per Region?

  • Let’s assume we are talking about MySQL or another RDBMs with ACID properties.
  • You might want to deploy MySQL as a master/master where each master is in a separate AZ and can support 100% of the required capacity
  • Given this configuration you have met the N+1 requirement per Region
  • This might be acceptable to you from the availability perspective, however keep in mind you do not control when those AZ’s become unavailable or worse run out of new capacity.
  • Always make sure an application like this is able to be redeployed through automation (i.e. self-healing) in another availability zone

Stateless/Stateful Applications & Capacity Defines the number of AZ’z per Region you need

  • Stateless applications are much easier to provide high availability for. You simply maximize redundant instances across AZ’s within reason (cost being the reason/limiting factor)
  • So effectively with stateless applications you tend to deploy to as many AZ’s as you have available
  • But what should determine the number of AZ’s you utilize per region is your stateful applications requirements for quorum or availability and how you choose to manage capacity

Examples of balancing High Availability & Cost using Apache Cassandra in AWS

This Cassandra calculator is a useful reference for this section
http://www.ecyrd.com/cassandracalculator/

Cassandra N+1 ( 4 AZ’s ) – Wasteful Version

The following assumes Cassandra is configured for eventual consistency with the following parameters:

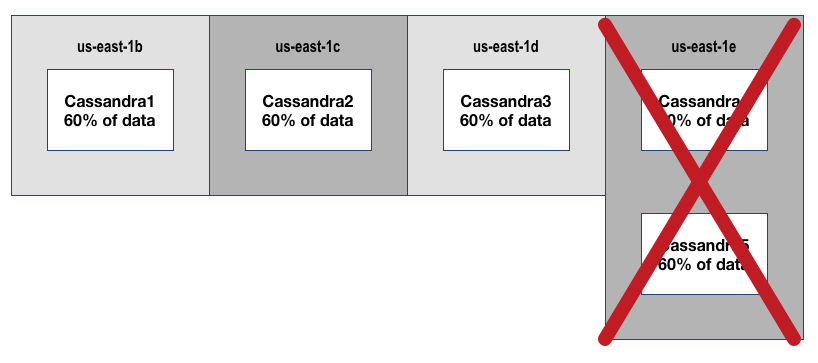
  • Cluster Size=5, Replication Factor=3, Write/Read=1
  • Region=us-east-1, Available AZ’s=4

Diagram Explanation

  • In this configuration you can lose 2 nodes without data availability impact
  • If you lose a 3rd node you would lose access to 60% of your data
  • Your node availability is N+2. HOWEVER, because you have only 4 AZ’s in us-east-1 that can be used, 2 nodes are required to be in 1 AZ
  • The available AZ’s in the region reduces your overall availability as a whole to N+1 in the event of ‘us-east-1e’ becoming unavailable
  • Thus the 5th node is completely unnecessary and wasteful ! 

cassandran1wasteful

Cassandra N+1 Cost Optimized (4 AZ’s) Version

The following assumes Cassandra is configured for eventual consistency with the following parameters:

  • Set Cluster Size=4, Replication Factor=2
  • Region=us-east-1, Available AZ’s=4

Diagram Explanation

  • You can now lose 1 node or one availability zone and still service 100% of requests
  • Losing a 2nd node result in 50% impact to data accessibility

cassandran1optimized

Cassandra N+2 Cost Optimized (4 AZ’s) Version

  • Set Cluster Size=4, Replication Factor=3
  • Region=us-east-1, Available AZ’s=4

Diagram Explanation

  • In order to optimize for cost and achieve N+2 you must have at least 4 AZs available
  • Otherwise, 100% of data per node is required to achieve N+2 with only 3 AZ’s
  • A better scenario is having 4 AZ’s or more where you can play with Replication Factor (aka data availability thus capacity needed to run the service)
  • To achieve cost optimized N+2 with 4 AZ’s we will set cluster size to 4 and Replication Factor to 3 resulting in this diagram/outcome

cassandran2optimized

This achieves the following

  • You can lose any 2 nodes or AZ’s above, and continue to run. If you lose a 3rd node you would have 75% impact to your data availability and need to fail/markdown the region for another region to takeover.
  • Also if you have a 4 node cluster with a replication factor=4 you have 100% of data on each node…this is not cost optimized for availability, but allows you to lose 3/4 nodes.
  • However, N+3 is considered too many eggs in one region and thus is not the right approach.
  • Instead if you architect for N+2 in each region + have global traffic management routing to active/active deployments, you will maximize your availability.

Cassandra With Only 2 Availability Zones

  • us-east-1 has 4 AZ’s this is actually a high number of available regions for AWS, in regions like us-west-2 and us-central-1 you only have 3, and 2 AZ’s respectively.
  • To clearly show the risk of ignoring availability zones & capacity while architecting for availability let’s look at the extreme case of deploying in eu-central-1 changing nothing else
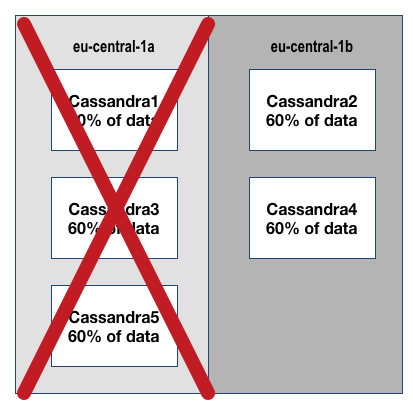
  • Again we use a Cluster Size=5,Replication Factor=3 as our initial example
  • eu-central-1 has only 2 AZ’s

cassandra2azbadness

  • As you can see if you lose eu-central-1a you lose 3 nodes at one time and 60% of your data becomes inaccessible.
  • If you lose eu-central-1b you are ok because you have > 100% of the required data available provided by your remaining nodes, but you cannot lose another node.
  • You cannot and should not ever deploy a service this way. Instead you need to tune the Cassandra cluster for the number of AZ’s.
  • Setting Cluster Size=2 and Replication Factor=2 for eu-central-1 allows an N+1 design
  • Unfortunately, cost optimization is not possible with only 2 AZ’s

cassandra2azn1

  • You can lose either node or AZ, and still have access to 100% of your data. You must lose access to the region or both AZs/nodes to have a service impact
  • You cannot achieve true N+2 with only 2 AZ’s in a region (You can achieve it via node redundancy only)
  • What I recommend in this case is have multi-region deployments (kudos if they happen to be in different public clouds), but within AWS deploy to eu-central-1 + eu-west-1 using N+1 deployments & global traffic management to achieve higher availability than a single region deployment would allow.

I hope this lengthy overview helps someone somewhere struggling with how to deploy applications to Availability Zones in AWS.
Feel free to contact me with any questions or corrections, thanks for reading !

How To: Maximize Availability Effeciently Using AWS Availability Zones Read More »

A simple, concurrent webcrawler written in Go

I have been playing with the Go programming language on an off for about a year. I started learning Go, because I was running into lots of issues distributing my Python codes dependencies to production machines, with specific security constraints. Go solves this problem by allowing you to compile a single binary that can be easily copied to all of your systems and you can cross compile it easily for different platforms. In addition, Go has a really great & simple way of dealing with concurrency, not to mention it really is concurrent unlike my beloved Python (GIL), which is great for plenty of use cases, but sometimes you need real concurrency. Here is some code I wrote for a simple concurrent webcrawler.

Here is the code for the command line utility fetcher. Notice it imports another package, crawler.

package main

import (
	"flag"
	"fmt"
	"strings"
	"github.com/jasonriedel/fetcher/crawler"
	"time"
)

var (
	sites = flag.String("url", "", "Name of sites to crawl comma delimitted")

)
func main() {
	flag.Parse()
	start := time.Now()
	count := 0
	if *sites != "" {
		ch := make(chan string)
		if strings.Contains(*sites, ",") {
			u := strings.Split(*sites, ",")
			for _, cu := range u {
				count++
				go crawler.Crawl(cu, ch) // start goroutine
			}
			for range u {
				fmt.Println(<-ch)
			}
		} else {
			count++
			go crawler.Crawl(*sites, ch) // start goroutine
			fmt.Println(<-ch)
		}
	} else {
		fmt.Println("Please specify urls")
	}
	secs := time.Since(start).Seconds()
	fmt.Printf("Total time: %.2fs - %d site(s)", secs, count)
}

I am not going go over the basics in this code, because that should be fairly self explanatory. What is important here is how we are implementing concurrency. Once the scripts validates you passed a string in (that is hopefully a URL – No input validation yet!) it starts by creating a channel via

ch := make(chan string)

After we initialized the channel, we need to split the sites passed in from the command line -url flag via comma in case there is more than 1 site to crawl. Then we loop through each site and kick off a go routine like so.

go crawler.Crawl(cu, ch) // start goroutine

At this point, our go routine is executing code from the imported crawler package mentioned above. Calling the method Crawl. Let’s take a look at it now…

package crawler

import (
	"fmt"
	"time"
	"io/ioutil"
	"io"
	"net/http"
)

func Crawl(url string, ch chan<- string) {
	start := time.Now()
	resp, err := http.Get(url)
	if err != nil {
		ch <- fmt.Sprint(err) // send to channel ch
		return
	}

	nbytes, err := io.Copy(ioutil.Discard, resp.Body)
	resp.Body.Close() // dont leak resources
	if err != nil {
		ch <- fmt.Sprintf("While reading %s: %v", url, err)
		return
	}
	secs := time.Since(start).Seconds()
	ch <- fmt.Sprintf("%.2fs %7d %s", secs, nbytes, url)
}

This is pretty straight forward. We start a timer, take the passed in URL and do an http.get …if that doesn’t error, the response Body is copied into nbytes, which is ultimately returned to the channel at the bottom of the function.

Once the code returns from crawler.Crawl to fetcher… it loops through each URL for channel output. This is very important. If you try placing a print inside of the same loop as your go routine you are going to change the behavior of your application to work in a serial/slower fashion because after each go routine it will wait for output. Putting the loop for channel output outside of the loop that launches the go routine enables them to all be launched one right after another, and then output is gathered after they have all been launched. This creates a very highly performant outcome. Here is an example of this script once it has been compiled.

➜  fetcher ./fetcher -url http://www.google.com,http://www.tuxlabs.com,http://www.imdb.com,http://www.southwest.com,http://www.udemy.com,http://www.microsoft.com,http://www.github.com,http://www.yahoo.com,http://www.linkedin.com,http://www.facebook.com,http://www.twitter.com,http://www.apple.com,http://www.betterment.com,http://www.cox.net,http://www.centurylink.net,http://www.att.com,http://www.toyota.com,http://www.netflix.com,http://www.etrade.com,http://www.thestreet.com
0.10s  195819 http://www.toyota.com
0.10s   33200 http://www.apple.com
0.14s   10383 http://www.google.com
0.37s   57338 http://www.facebook.com
0.39s   84816 http://www.microsoft.com
0.47s  207124 http://www.att.com
0.53s  294608 http://www.thestreet.com
0.65s  264782 http://www.twitter.com
0.66s  428256 http://www.southwest.com
0.74s   99983 http://www.betterment.com
0.80s   41372 http://www.linkedin.com
0.82s  520502 http://www.yahoo.com
0.87s  150688 http://www.etrade.com
0.89s   51826 http://www.udemy.com
1.13s   71862 http://www.tuxlabs.com
1.16s   25509 http://www.github.com
1.30s  311818 http://www.centurylink.net
1.33s  169775 http://www.imdb.com
1.33s   87346 http://www.cox.net
1.75s  247502 http://www.netflix.com
Total time: 1.75s - 20 site(s)%

20 sites in 1.75s seconds..that is not too shabby. The remainder of the fetcher code runs a go routine if only one site is passed..then returns an error if message if a url is not passed in on the command line, and finally outputs the time it took total to run for all sites. The go routine is not necessary in the case of running a single url, however, it doesn’t hurt and I like the consistency of how the code reads this way.

Hopefully you enjoyed this brief show of the Go programming language. If you decide to get into Go, I cannot recommend this book enough : https://www.amazon.com/Programming-Language-Addison-Wesley-Professional-Computing/dp/0134190440 . This book has a bit of a cult following due to one of the authors being https://en.wikipedia.org/wiki/Brian_Kernighan who co-authored what consider to be the best book on C ever written (I own it, it’s really good too). I bought other Go books before this one, and I have to say don’t waste your money, buy this one and it is all you will need.

The github code for the examples above can be found here : https://github.com/jasonriedel/fetcher

Godspeed, happy learning.

A simple, concurrent webcrawler written in Go Read More »

How to use Boto to Audit your AWS EC2 instance security groups

Boto is a Software Development Kit for accessing the AWS API’s using Python.

https://github.com/boto/boto3

Recently, I needed to determine how many of my EC2 instances were spawned in a public subnet, that also had security groups with wide open access on any port via any protocol to the instances. Because I have an IGW (Internet Gateway) in my VPC’s and properly setup routing tables, instances launched in the public subnets with wide open security groups (allowing ingress traffic from any source) is a really bad thing 🙂

Here is the code I wrote to identify these naughty instances. It will require slight modifications in your own environment, to match your public subnet IP Ranges, EC2 Tags, and Account names.

#!/usr/bin/env python
__author__ = 'Jason Riedel'
__description__ = 'Find EC2 instances provisioned in a public subnet that have security groups allowing ingress traffic from any source.'
__date__ = 'June 5th 2016'
__version__ = '1.0'

import boto3

def find_public_addresses(ec2):
    public_instances = {}
    instance_public_ips = {}
    instance_private_ips = {}
    instance_ident = {}
    instances = ec2.instances.filter(Filters=[{'Name': 'instance-state-name', 'Values': ['running'] }])

    # Ranges that you define as public subnets in AWS go here.
    public_subnet_ranges = ['10.128.0', '192.168.0', '172.16.0']

    for instance in instances:
        # I only care if the private address falls into a public subnet range
        # because if it doesnt Internet ingress cant reach it directly anyway even with a public IP
        if any(cidr in instance.private_ip_address for cidr in public_subnet_ranges):
            owner_tag = "None"
            instance_name = "None"
            if instance.tags:
                for i in range(len(instance.tags)):
                    #comment OwnerEmail tag out if you do not tag your instances with it.
                    if instance.tags[i]['Key'] == "OwnerEmail":
                        owner_tag = instance.tags[i]['Value']
                    if instance.tags[i]['Key'] == "Name":
                        instance_name = instance.tags[i]['Value']
            instance_ident[instance.id] = "Name: %s\n\tKeypair: %s\n\tOwner: %s" % (instance_name, instance.key_name, owner_tag)
            if instance.public_ip_address is not None:
                values=[]
                for i in range(len(instance.security_groups)):
                    values.append(instance.security_groups[i]['GroupId'])
                public_instances[instance.id] = values
                instance_public_ips[instance.id] = instance.public_ip_address
                instance_private_ips[instance.id] = instance.private_ip_address

    return (public_instances, instance_public_ips,instance_private_ips, instance_ident)

def inspect_security_group(ec2, sg_id):
    sg = ec2.SecurityGroup(sg_id)

    open_cidrs = []
    for i in range(len(sg.ip_permissions)):
        to_port = ''
        ip_proto = ''
        if 'ToPort' in sg.ip_permissions[i]:
            to_port = sg.ip_permissions[i]['ToPort']
        if 'IpProtocol' in sg.ip_permissions[i]:
            ip_proto = sg.ip_permissions[i]['IpProtocol']
            if '-1' in ip_proto:
                ip_proto = 'All'
        for j in range(len(sg.ip_permissions[i]['IpRanges'])):
            cidr_string = "%s %s %s" % (sg.ip_permissions[i]['IpRanges'][j]['CidrIp'], ip_proto, to_port)

            if sg.ip_permissions[i]['IpRanges'][j]['CidrIp'] == '0.0.0.0/0':
                #preventing an instance being flagged for only ICMP being open
                if ip_proto != 'icmp':
                    open_cidrs.append(cidr_string)

    return open_cidrs


if __name__ == "__main__":
    #loading profiles from ~/.aws/config & credentials
    profile_names = ['de', 'pe', 'pde', 'ppe']
    #Translates profile name to a more friendly name i.e. Account Name
    translator = {'de': 'Platform Dev', 'pe': 'Platform Prod', 'pde': 'Products Dev', 'ppe': 'Products Prod'}
    for profile_name in profile_names:
        session = boto3.Session(profile_name=profile_name)
        ec2 = session.resource('ec2')

        (public_instances, instance_public_ips, instance_private_ips, instance_ident) = find_public_addresses(ec2)

        for instance in public_instances:
            for sg_id in public_instances[instance]:
                open_cidrs = inspect_security_group(ec2, sg_id)
                if open_cidrs: #only print if there are open cidrs
                    print "=================================="
                    print " %s, %s" % (instance, translator[profile_name])
                    print "=================================="
                    print "\tprivate ip: %s\n\tpublic ip: %s\n\t%s" % (instance_private_ips[instance], instance_public_ips[instance], instance_ident[instance])
                    print "\t=========================="
                    print "\t open ingress rules"
                    print "\t=========================="
                    for cidr in open_cidrs:
                        print "\t\t" + cidr

To run this you also need to setup your .aws/config and .aws/credentials file.

http://docs.aws.amazon.com/cli/latest/userguide/cli-chap-getting-started.html#cli-config-files

Email me tuxninja [at] tuxlabs.com if you have any issues.
Boto is awesome 🙂 Note so is the AWS CLI, but requires some shell scripting as opposed to Python to do cool stuff.

The github for this code here https://github.com/jasonriedel/AWS/blob/master/sg-audit.py

Enjoy !

How to use Boto to Audit your AWS EC2 instance security groups Read More »

Consul for Service Discovery

Why Service Discovery ?

Service Discovery effectively replaces the process of having to manually assign or automate your own DNS entries for nodes on your network. Service Discovery aims to move even further away from treating VM’s like pets to cattle, by getting rid of the age old practice of Hostname & FQDN having contextual value. Instead when using services discovery nodes are automatically registered by an agent and automatically are configured in DNS for both nodes and services running on the machine.

Consul

Consul by Hashicorp is becoming the de-facto standard for Service Discovery. Consul’s full features & simplistic deployment model make it an optimal choice for organizations looking to quickly deploy Service Discovery capabilities in their environment.

Components of Consul

  1. The Consul Agent
  2. An optional JSON config file for each service located under /etc/consul.d/<service>.json
    1. If you do not specific a JSON file, consul can still start and will provide discovery for the nodes (they will have DNS as well)

A Quick Example of Consul

How easy is it to deploy console ?

  1. Download / Decompress and install the Consul agent – https://www.consul.io/downloads.html
  2. Define services in a JSON file (if you want) – https://www.consul.io/intro/getting-started/services.html
  3. Start the agent on the nodes – https://www.consul.io/intro/getting-started/join.html
  4.  Make 1 node join 1 other node (does not matter which node) to join the cluster, which gets you access to all cluster metadata

Steps 1 and 2 Above

  1. After downloading the Consul binary to each machine and decompressing it, copy it to /usr/local/bin/ so it’s in your path.
  2. Create the directory
    sudo mkdir /etc/consul.d
  3. Optionally, run the following to create a JSON file defining a fake service running
echo '{"service": {"name": "web", "tags": ["rails"], "port": 80}}' \
    >/etc/consul.d/web.json

Step 3 Above

Run the agent on each node, changing IP accordingly.

tuxninja@consul-d415:~$ consul agent -server -bootstrap-expect 1 -data-dir /tmp/consul -node=agent-one -bind=10.73.172.110 -config-dir /etc/consul.d

Step 4 Above

tuxninja@consul-d415:~$ consul join 10.73.172.108
Successfully joined cluster by contacting 1 nodes.

Wow, simple…ok now for the examples….

Show cluster members

tuxninja@consul-dcb3:~$ consul join 10.73.172.110
Successfully joined cluster by contacting 1 nodes.

Look up DNS for a node

tuxninja@consul-dcb3:~$ dig @127.0.0.1 -p 8600 agent-one.node.consul
; <<>> DiG 9.9.5-3ubuntu0.8-Ubuntu <<>> @127.0.0.1 -p 8600 agent-one.node.consul
; (1 server found)
;; global options: +cmd
;; Got answer:
;; ->>HEADER<<- opcode: QUERY, status: NOERROR, id: 2450
;; flags: qr aa rd; QUERY: 1, ANSWER: 1, AUTHORITY: 0, ADDITIONAL: 0
;; WARNING: recursion requested but not available
;; QUESTION SECTION:
;agent-one.node.consul.		IN	A
;; ANSWER SECTION:
agent-one.node.consul.	0	IN	A	10.73.172.110
;; Query time: 1 msec
;; SERVER: 127.0.0.1#8600(127.0.0.1)
;; WHEN: Tue May 03 21:43:47 UTC 2016
;; MSG SIZE  rcvd: 76
tuxninja@consul-dcb3:~$

Lookup DNS for a service

tuxninja@consul-dcb3:~$  dig @127.0.0.1 -p 8600 web.service.consul
; <<>> DiG 9.9.5-3ubuntu0.8-Ubuntu <<>> @127.0.0.1 -p 8600 web.service.consul
; (1 server found)
;; global options: +cmd
;; Got answer:
;; ->>HEADER<<- opcode: QUERY, status: NOERROR, id: 55798
;; flags: qr aa rd; QUERY: 1, ANSWER: 1, AUTHORITY: 0, ADDITIONAL: 0
;; WARNING: recursion requested but not available
;; QUESTION SECTION:
;web.service.consul.		IN	A
;; ANSWER SECTION:
web.service.consul.	0	IN	A	10.73.172.110
;; Query time: 2 msec
;; SERVER: 127.0.0.1#8600(127.0.0.1)
;; WHEN: Tue May 03 21:46:54 UTC 2016
;; MSG SIZE  rcvd: 70
tuxninja@consul-dcb3:~$

Query the REST API for Nodes

tuxninja@consul-dcb3:~$ curl localhost:8500/v1/catalog/nodes
[{"Node":"agent-one","Address":"10.73.172.110","TaggedAddresses":{"wan":"10.73.172.110"},"CreateIndex":3,"ModifyIndex":1311},{"Node":"agent-two","Address":"10.73.172.108","TaggedAddresses":{"wan":"10.73.172.108"},"CreateIndex":1338,"ModifyIndex":1339}

Query the REST API for Services

tuxninja@consul-dcb3:~$ curl http://localhost:8500/v1/catalog/service/web
[{"Node":"agent-one","Address":"10.73.172.110","ServiceID":"web","ServiceName":"web","ServiceTags":["rails"],"ServiceAddress":"","ServicePort":80,"ServiceEnableTagOverride":false,"CreateIndex":5,"ModifyIndex":772}

Consul for Service Discovery Read More »