tuxninja

Tuxninja aka Jason Riedel has worked as a Systems & Network Administrator and Code Hacker since 1999. Since 2005 he has worked for PayPal with a focus on Operations Architecture. He is also CEO of Tuxlabs LLC where he dedicates his time to the experimentation and close study of new technologies and programming languages.

Deployment Architecture & Stateless vs. Stateful Services

The following is intended to be a primer on deployment architecture for systems engineers & software engineers. This is the first architecturally focused post on this blog. The hope is that it will serve as a foundation for future architecturally focused blog posts that I hope you find value in.

The Motivation For This Article

I have been an Operations Architect by trade for many years. One of the primary functions I have in this role is reviewing each teams software architecture to figure out the right way to deploy & scale their system while providing the maximum availability for it, and while not jeopardizing the existing more complex system. One of the most important lessons I learned about software architecture while doing this role many years ago, was the difference between a stateless and stateful service. Why you ask ? In short because knowing whether a service was stateless or stateful dictated how I should scale & provide high availability to the service on the infrastructure side. It told me the proper deployment architecture to use.

What Are Stateless Services ?

A stateless service is a service that can handle each incoming request, without knowing anything about any previous request.  Meaning, the processing of any request doesn’t require getting data about any previous requests from a database or session store. What this means is that each instance of this service (in our example a web server) can be scaled independently. To provide maximum availability for a stateless service all you need are instances ! Lot’s and lot’s of instances/nodes/vms/containers etc.. aka redundancy ! Very simple right ? And you should have seen this a thousand times if you have ever run an infrastructure that supports a website.

How To Deploy & Scale Stateless Services

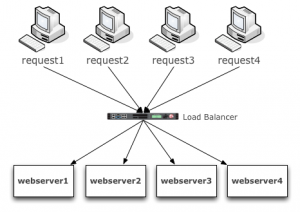
Here is a quick picture of how we scale a stateless service.

SimpleStateless

Pretty straight forward. No matter how many incoming requests there are, they can be distributed amongst X number of web servers. The application running on each web server will reply with the correct response, because it has everything it needs to reply.  More to the point it doesn’t need to lookup any previous result or ‘state’ information in a database somewhere to know what to reply with. If we need more capacity, we add more web server instances. If one of the web servers fail, we have X number of servers behind the load balancer, that can still handle the requests. You should be able to see clearly how easy it is to scale and provide high availability for stateless services. Most companies deploy this kind of pattern regionally, such that you can lose an entire region and requests will still be processed in another region. Anyone who runs on AWS, like Netflix for example, does this for their stateless services. Now let’s talk about the uglier brother.

What Are Stateful Services?

If stateless services are services that can process requests without knowing anything about the previous request, it should be pretty self explanatory what a stateful service is right 😉 ?

A stateful service is a service that depends on the result of a previous request to process a subsequent request. If a web request depends on the result of a previous request, how would it get that result ?  By looking that result up in a database. However, in order to look up the result of a previous request, we have to know something about the request we want to look up. For example, the user or unique session id the request came from. If we knew the user or session that performed the original request, we could then query for that result when the subsequent request comes in from that user. But how is this actually implemented ?

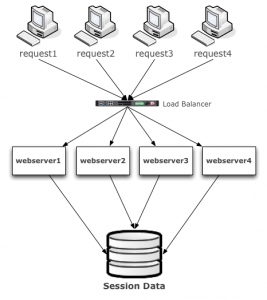
Usually, upon the initial request a session cookie is created, in it a unique identifier is stored and upon subsequent requests from that same browser the web server receiving the request also receives the unique identifier and can query the database for whatever information it needs related to the users session. The information in that session is called ‘state’ and it is usually modified frequently as the user makes more requests moving about the website.

Before we move here is a quick graphic of this architecture

SimpleStateful

Btw, have you ever heard someone say, my applications requires sticky or persistent load balancing ? That is because their application is stateful, but they do not have a session store. Forcing the load balancer to send the request back to the same machine is a cheap & horrible way to solve this problem. </end rant> Moving on…

How To Deploy & Scale Stateful Services

There are two approaches to deploying stateful services ‘active/active’ and ‘active/passive’. Active/Active is the preferred deployment pattern, but it is also more cumbersome to deploy. To keep this example simple, we will avoid NoSQL flavors in our example (although these are commonly preferred for session stores) and use MySQL in our example instead.

Active/Active MySQL

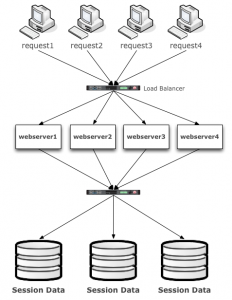
Active / Active also known as Multi-Master refers to having two or more (database) nodes or instances available AND servicing requests actively using two or more nodes. The benefits of Active/Active are bountiful. You can lose a node, without having to failover. You can add a node to scale out for more capacity & performance. As with anything there are limits to how far out you can scale, but active/active still the best deployment architecture for databases today.

SimpleActiveActive

Btw, if you deploy this architecture make sure you pay special attention to your Load Balancer layer. In my opinion a pair of active/passive LTMs is not enough. Remember your availability is only as good as your weakest link. Solves here might include, Any Cast, BGP, GTM, and replication + retry to other regions.

Active/Passive MySQL

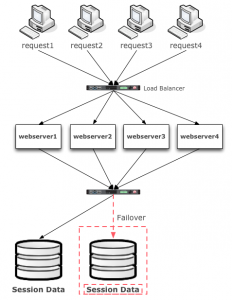
Active/Passive aka Master/Slave refers to having one database node or instance available to service requests actively and having another spare node that can be elected as the master (i.e. failed over to) in the event of a failure on the primary node. Again, this is easier to implement, but does not scale as well, nor does it provide great availability due to the time it takes to failover and due to the fact that a failover node is typically not regularly tested.  A ‘warm’ node where transactions are constantly being ran through it aka the active/active pattern we discussed in the previous example is always superior.

SimpleActivePassive

Summary

Early in my career I learned these application characteristics and common patterns for how to deploy applications with these constraints in the best way possible. However, this is the tip of the ice berg. With todays technology stacks we are running a lot more than just websites. Many systems being deployed now include things like Message Buses, NoSQL stores, and Clusters. Each of these categories and more importantly the technologies within them have additional features & constraints surrounding their availability and scalability. My hope is that this article gave you a strong foundation for you to continue your own learning as it relates to deployment architecture & infrastructure for stateless and stateful systems so that you can deploy scalable & highly available architectures.

Keep Learning,
Jason Riedel

Deployment Architecture & Stateless vs. Stateful Services Read More »

How To: Enable SSH On A Cisco 2950

First you have to make sure you are running a version of code that has encryption. See my previous article for instructions on how to upgrade the code. Once your code is upgraded, here are the steps to enable SSH on a Cisco 2950.

Generate An SSH Key

switch-2950-1.tuxlabs.com#config t
Enter configuration commands, one per line.  End with CNTL/Z.
switch-2950-1.tuxlabs(config)#crypto key generate rsa modulus 1024
The name for the keys will be: switch-2950-1.tuxlabs.com.tuxlabs.com

% The key modulus size is 1024 bits
Generating RSA keys ...
[OK]

switch-2950-1.tuxlabs(config)#exit
switch-2950-1.tuxlabs.com#

Verify your key like so

switch-2950-1.tuxlabs.com#show crypto key mypubkey rsa 
% Key pair was generated at: 00:10:35 UTC Mar 1 1993
Key name: switch-2950-1.tuxlabs.com.tuxlabs.com
 Usage: General Purpose Key
 Key Data:
  30819F30 0D06092A 864886F7 0D010101 05000381 8D003081 89028181 00E6AA25 
  8DB58145 F882CD0B C62F5123 AB0064A6 A09BD636 FA854D82 B1510A31 3A00606E 
  00F601F1 ECF64FCC 0F516E73 E80E0961 9CCCE91B 5C3D5919 4803B805 04AC2633 
  9D0A32E8 0196F572 5CE9FFF4 A5C27FC4 698DE75B F0573804 22D0CCFE 58936F4E 
  5BE394F4 3BDED1AC DC1BF1C9 5E71ABD5 34F1C21E CDA47B7E 72D40C34 6B020301 0001
% Key pair was generated at: 00:10:41 UTC Mar 1 1993
Key name: switch-2950-1.tuxlabs.com.tuxlabs.com.server
 Usage: Encryption Key
 Key Data:
  307C300D 06092A86 4886F70D 01010105 00036B00 30680261 009F3354 2ECB6FB6 
  7A19D04D 929FEB38 05145D39 C9DB6CAB 5AC1A262 14FEFFBC DE6E5FA9 8565BEA6 
  1A888A92 C7D1ED2E DB8D3894 D972C9AE 853DFB98 8261D518 0F8A994C 9293C49C 
  0E946A95 0F89EA08 45E4DCB7 74F5A23C CDC5938C CD01C6C1 4D020301 0001
switch-2950-1.tuxlabs.com#

Wow 1993, feels good to be a time machine 🙂

Configure the allowed number of retries

switch-2950-1.tuxlabs.com#config t                     
Enter configuration commands, one per line.  End with CNTL/Z.
switch-2950-1.tuxlabs(config)#ip ssh authentication-retries 5
switch-2950-1.tuxlabs(config)#exit
switch-2950-1.tuxlabs.com#

Enabling SSH on the VTYs

switch-2950-1.tuxlabs.com#config t           
Enter configuration commands, one per line.  End with CNTL/Z.
switch-2950-1.tuxlabs(config)#line vty 0 4
switch-2950-1.tu(config-line)#login local
switch-2950-1.tu(config-line)#transport input ssh
switch-2950-1.tu(config-line)#line vty 5 15
switch-2950-1.tu(config-line)#login local
switch-2950-1.tu(config-line)#transport input ssh
switch-2950-1.tu(config-line)#exit
switch-2950-1.tuxlabs(config)#exit
switch-2950-1.tuxlabs.com#wr mem
Building configuration...
[OK]
switch-2950-1.tuxlabs.com#

Configuring A Username

When you’re running telnet you don’t need a username. But when you are using SSH, you do.

switch-2950-1.tuxlabs.com#config t 
Enter configuration commands, one per line.  End with CNTL/Z.
switch-2950-1.tuxlabs(config)#username tuxninja privilege 15 password sup3rs3cr3t
switch-2950-1.tuxlabs(config)#exit
switch-2950-1.tuxlabs.com#wr mem
Building configuration...
[OK]
switch-2950-1.tuxlabs.com#

Now were golden, let’s test.

➜  ~  ssh tuxninja@switch-2950-1.tuxlabs.com
The authenticity of host 'switch-2950-1.tuxlabs.com (192.168.1.2)' can't be established.
RSA key fingerprint is 21:6b:44:bb:24:ff:ef:14:9d:f2:00:44:64:3d:3b:f8.
Are you sure you want to continue connecting (yes/no)? yes
Warning: Permanently added 'switch-2950-1.tuxlabs.com,192.168.1.2' (RSA) to the list of known hosts.
tuxninja@switch-2950-1.tuxlabs.com's password: 

switch-2950-1.tuxlabs.com#show privil
switch-2950-1.tuxlabs.com#show privilege 
Current privilege level is 15
switch-2950-1.tuxlabs.com#exit
Connection to switch-2950-1.tuxlabs.com closed.
➜  ~

Awesome ! That concludes this short tutorial.

How To: Enable SSH On A Cisco 2950 Read More »

How To: Upgrade IOS On A Cisco 2950

My cisco 2950 came with an older IOS version 12.1, but more importantly, one that does not support encryption, and thus I cannot use SSH. I need to upgrade the code aka IOS Image on this switch to enable SSH. So here we go, I’ll be referencing the following guide : http://kb.promise.com/KnowledgebaseArticle10139.aspx throughout this how to article. Note: You should be in enable/privilege 15 mode for the duration of this article.

Existing version info

switch-2950-1.tuxlabs.com#show version
Cisco Internetwork Operating System Software 
IOS (tm) C2950 Software (C2950-I6Q4L2-M), Version 12.1(19)EA1c, RELEASE SOFTWARE (fc2)
Copyright (c) 1986-2004 by cisco Systems, Inc.
Compiled Mon 02-Feb-04 23:29 by yenanh
Image text-base: 0x80010000, data-base: 0x8058A000

ROM: Bootstrap program is C2950 boot loader

switch-2950-1.tuxlabs.com uptime is 1 hour, 38 minutes
System returned to ROM by power-on
System image file is "flash:/c2950-i6q4l2-mz.121-19.EA1c.bin"

cisco WS-C2950T-24 (RC32300) processor (revision P0) with 20808K bytes of memory.
Processor board ID FOC0812T17M
Last reset from system-reset
Running Enhanced Image
24 FastEthernet/IEEE 802.3 interface(s)
2 Gigabit Ethernet/IEEE 802.3 interface(s)

32K bytes of flash-simulated non-volatile configuration memory.
Base ethernet MAC Address: 00:0F:8F:DB:4E:00
Motherboard assembly number: 73-6114-10
Power supply part number: 34-0965-01
Motherboard serial number: FOC0812243L
Power supply serial number: DAB080842YJ
Model revision number: P0
Motherboard revision number: A0
Model number: WS-C2950T-24
System serial number: FOC0812T17M
Configuration register is 0xF

switch-2950-1.tuxlabs.com#

Cisco Image & TFTP Server

I had to register for the Cisco site to download the latest image, with support for encryption. This is the image I will be installing : c2950-i6k2l2q4-mz.121-22.EA14.bin

After the image is downloaded, we need to configure the TFTP server. Mac OS X comes with tftpd automatically. You are going to want to place the imagine in /private/tftpboot.  After you have copied the image there, make absolutely sure you update the permissions. Otherwise, your tftp request will timeout from your device.

➜  ~  sudo chmod 766 /private/tftpboot/*
➜  ~  ls -l /private/tftpboot       
total 7272
-rwxrw-rw-@ 1 root  wheel  3722814 Sep  7 23:21 c2950-i6k2l2q4-mz.121-22.EA14.bin
➜  ~

After you update the permissions you are ready to start TFTP.


➜  ~  netstat -atp UDP | grep tftp                                     
➜  ~  sudo launchctl load -F /System/Library/LaunchDaemons/tftp.plist 
dyld: DYLD_ environment variables being ignored because main executable (/usr/bin/sudo) is setuid or setgid
➜  ~  netstat -atp UDP | grep tftp                                   
udp4       0      0  *.tftp                 *.*                               
udp6       0      0  *.tftp                 *.*                               
➜  ~

Great TFTP is running. Now we are ready to request it from the Cisco switch, aka the client in this scenario.

Copy TFTP Flash

switch-2950-1.tuxlabs.com#copy tftp flash
Address or name of remote host []? 192.168.1.123
Source filename []? c2950-i6k2l2q4-mz.121-22.EA14.bin
Destination filename [c2950-i6k2l2q4-mz.121-22.EA14.bin]? 
Accessing tftp://192.168.1.123/c2950-i6k2l2q4-mz.121-22.EA14.bin...
Loading c2950-i6k2l2q4-mz.121-22.EA14.bin from 192.168.1.123 (via Vlan1): !!!!!!!!!.!!!!!!!!!!!!!!!!!!!!!!!!!!!!!!!!!!!!!!!.!!!!!!!!!!!!!!!!!!!!!!!!!!!!!!!!!!!!!!!!!!!!!!!!!!!!!!!!!!!!!!!!!!!!!!!!!!!!!!!!!!!!!!!!!!!!!!!!!!!!!!!!!!!!!!!!!!!!!!!!!!!!!!!!!!!!!!!!!!!!!!!!!!!!!!!!!!!!!!!!!!!!!!!!!!!!!!!!!!!!!!!!!!!!!!!!!!!!!!!!!!!!!!!!!!!!!!!!!!!!!!!!!!!!!!!!!!!!!!!!!!!!!!!!!!!!!!!!!!!!!!!!!!!!!!!!!!!!!!!!!!!!!!!!!!!!O!OO!OO!OOOOO!OOOO!
%Error copying flash:/c2950-i6k2l2q4-mz.121-22.EA14.bin (No space left on device)
switch-2950-1.tuxlabs.com#

Uh oh shaggy ! I am out of space. After doing a ‘dir flash’ I saw that really I had no choice, but to delete my existing flash image to make room for the new one. Feels dangerous and scary, but luckily this is my lab environment 🙂

Deleting From Flash

switch-2950-1.tuxlabs.com#delete flash://c2950-i6q4l2-mz.121-19.EA1c.bin
Delete filename [c2950-i6q4l2-mz.121-19.EA1c.bin]? 
Delete flash:/c2950-i6q4l2-mz.121-19.EA1c.bin? [confirm]
switch-2950-1.tuxlabs.com#

Copy TFTP Flash Again (This time with our fingers crossed)

switch-2950-1.tuxlabs.com#copy tftp flash                               
Address or name of remote host [192.168.1.123]? 
Source filename [c2950-i6k2l2q4-mz.121-22.EA14.bin]? 
Destination filename [c2950-i6k2l2q4-mz.121-22.EA14.bin]? 
Accessing tftp://192.168.1.123/c2950-i6k2l2q4-mz.121-22.EA14.bin...
Loading c2950-i6k2l2q4-mz.121-22.EA14.bin from 192.168.1.123 (via Vlan1): !!!!!!!!!!!!!!!!!!!!!!!!!!!!!!!.!!!!!!!!!!!!!!!!!!!!!!!!!!!!!!!!!!!!!!!!!!!!!!!!!!!!!!!!!!!!!!!!!!!!!!!!!!!!!!!!!!!!!!!!!!!!!!!!!!!!!!!!!!!!!!!!!!!!!!!!!!!!!!!!!!!!!!!!!!!!!!!!!!!!!!!!!!!!!!!!!!!!!!!!!!!!!!!!!!!!!!!!!!!!!!!!!!!!!!!!!!!!!!!!!!!!!!!!!!!!!!!!!!!!!!!!!!!!!!!!!!!!!!!!!!!!!!!!!!!!!!!!!!!!!!!!!!!!!!!!!!!!!!!!!!!!!!!!!!!!!!!!!!!!!!!!!!!!!!!!!!!!!!!!!!!!!!!!!!!!!!!!!!!!!!!!!!!!!!!!!!!!!!!!!!!!!!!!!!!!!!!!!!!!!!!!!!!!!!!!!!!!!!!!!!!!!!!!!!!!!!!!!!!!!!!!!!!!!!!!!!!!!!!!!!!!!!!!!!!!!!!!!!!!!!!!!!!!!!!!!!!!!!!!!!!!!!!!!!!!!!!!!!!!!!!!!!!!!!!!!!!!!!!!!!!!!!!!!!!!!!!!!!!!!!!!!!!!!!!!!!!!!!.!!!!!!!!!!!!!!!!!!!!!!!!!!!!!!!!!!!!!!!!!!!!!!!!!!!!!!!!!!!!!!!!!!!!!!!!!!!!!!!!!!!!!!!!!!!!!!!!!!!!!!!!!!!!!!!!!!!!!!!!!!!!!!!!!!!
[OK - 3722814 bytes]

3722814 bytes copied in 143.080 secs (26019 bytes/sec)
switch-2950-1.tuxlabs.com#

Whew…close one 🙂 To be on the safe side we can verify our image like this.

switch-2950-1.tuxlabs.com#verify /md5 c2950-i6k2l2q4-mz.121-22.EA14.bin
.............................................................................................................................................................................................................................................................................................................................................................................................................................................................................................................................................................................................................................................................................................................................................................................................................................................................................................................................................Done!
verify /md5 (flash:c2950-i6k2l2q4-mz.121-22.EA14.bin) = 8d3250ee253b81b7fe2762e281773fbc


switch-2950-1.tuxlabs.com#

Next we make our new flash image bootable.

switch-2950-1.tuxlabs.com#config t
switch-2950-1.tuxlabs(config)#boot system flash:c2950-i6k2l2q4-mz.121-22.EA14.bin
switch-2950-1.tuxlabs(config)#exit
switch-2950-1.tuxlabs.com#show boot
BOOT path-list:       flash:c2950-i6k2l2q4-mz.121-22.EA14.bin
Config file:          flash:/config.text
Private Config file:  flash:/private-config.text
Enable Break:         no
Manual Boot:          no
HELPER path-list:     
NVRAM/Config file
      buffer size:    32768
switch-2950-1.tuxlabs.com#wr mem
Building configuration...
[OK]
switch-2950-1.tuxlabs.com#

Great, that looks good, now we are ready to reload our switch !

switch-2950-1.tuxlabs.com#reload
Proceed with reload? [confirm]
Connection closed by foreign host.
➜  ~

Once the switch comes back to life, validate the version info.

switch-2950-1.tuxlabs.com#show version
Cisco Internetwork Operating System Software 
IOS (tm) C2950 Software (C2950-I6K2L2Q4-M), Version 12.1(22)EA14, RELEASE SOFTWARE (fc1)
Technical Support: http://www.cisco.com/techsupport
Copyright (c) 1986-2010 by cisco Systems, Inc.
Compiled Tue 26-Oct-10 10:35 by nburra
Image text-base: 0x80010000, data-base: 0x80680000

ROM: Bootstrap program is C2950 boot loader

switch-2950-1.tuxlabs.com uptime is 2 minutes
System returned to ROM by power-on
System image file is "flash:c2950-i6k2l2q4-mz.121-22.EA14.bin"


This product contains cryptographic features and is subject to United
States and local country laws governing import, export, transfer and
use. Delivery of Cisco cryptographic products does not imply
third-party authority to import, export, distribute or use encryption.
Importers, exporters, distributors and users are responsible for
compliance with U.S. and local country laws. By using this product you
agree to comply with applicable laws and regulations. If you are unable
to comply with U.S. and local laws, return this product immediately.

A summary of U.S. laws governing Cisco cryptographic products may be found at:
http://www.cisco.com/wwl/export/crypto/tool/stqrg.html

If you require further assistance please contact us by sending email to
export@cisco.com.

cisco WS-C2950T-24 (RC32300) processor (revision P0) with 19911K bytes of memory.
Processor board ID FOC0812T17M
Last reset from system-reset
Running Enhanced Image
24 FastEthernet/IEEE 802.3 interface(s)
2 Gigabit Ethernet/IEEE 802.3 interface(s)

32K bytes of flash-simulated non-volatile configuration memory.
Base ethernet MAC Address: 00:0F:8F:DB:4E:00
Motherboard assembly number: 73-6114-10
Power supply part number: 34-0965-01
Motherboard serial number: FOC0812243L
Power supply serial number: DAB080842YJ
Model revision number: P0
Motherboard revision number: A0
Model number: WS-C2950T-24
System serial number: FOC0812T17M
Configuration register is 0xF

switch-2950-1.tuxlabs.com#

We went from 2004, to 2010…but 2010 is the latest image available for my ancient switch ! Awesome. Now we are ready to enable SSH in the next article !

Thanks for reading,
Jason Riedel


How To: Upgrade IOS On A Cisco 2950 Read More »

Object-Oriented Programming With Python : Inheritance (2/3)

Continuing on our Object-Oriented Programming with Python series, this is article 2 of 3 on the 2nd pillar, Inheritance. You can find the first article about Encapsulation in this series here.

Inheritance – The Second Pillar

Inheritance in OOP is the ability to have one class inherit the attributes of another class.

Inheritance is simple to implement, but arguably the most powerful pillar in OOP, providing the most value to a programmer. It is the pillar that allows for effective re-use of code organized in classes reducing the amount of lines a programmer has to write to do something useful in their program.

In case you don’t remember from the previous article in this series on encapsulation, a class is a blueprint or template that contains methods, objects and attributes. Once defined a class can be inherited by another class. At which point the child class (aka derived class or subclass) contains all the goodness that the parent class ( aka super class or base class) provides.

Here is an example of inheritance :

#!/usr/bin/env python

import requests

class Tuxlabs(object):

    def setter(self, website):
        if 'http' in website:
            self.website = website
        else:
            print 'ERROR: Unable to set website to %s.\nRequired format is: http://www.example.com' % (website)

    def getter(self):
        return self.website

class Crawl(Tuxlabs):

    def download(self, website):
        self.setter(website)
        crawlTarget = self.getter()
        r = requests.get(crawlTarget)
        print r.text

website = 'http://www.tuxlabs.com'
crawl = Crawl()
crawl.download(website)

The code above downloads the webpage ‘tuxlabs.com’ and outputs it’s contents to STDOUT using the ‘requests’ module.

<rant>If you are a Python developer who is not already familiar with the requests module you should be ashamed of yourself 🙂 It is the most fantastically simple implementation of Python HTTP client functions available.</end rant>

In this example we have defined two classes, one called ‘Tuxlabs’ and one called ‘Crawl’. Tuxlabs inherits a base class ‘object’ and the ‘Crawl’ class inherits ‘Tuxlabs’. If you’re wondering why Tuxlabs inherits from object see here.  Our ‘Tuxlabs’ class has two methods a setter() & a getter() you will remember from the previous article on encapsulation. Now let’s focus on the real point in this example, the ‘Crawl’ class.

The ‘Crawl’ class as previously mention inherits the Tuxlabs class when it is defined or implemented ‘class Crawl(Tuxlabs):’. This means when an instance of Crawl initialized it will inherit all the attributes from the Tuxlabs class in addition to it’s own methods defined in the ‘Crawl’ class. The ‘Crawl’ class has only one method defined ‘download’ that takes a single argument, website.

Inside the download method in the crawl class we see ‘self.setter(website)’, but this is interesting, because we are using ‘self’ to call ‘setter()’, but self is actually referring to the ‘Crawl’ class and the ‘Crawl’ class  only has download defined. So shouldn’t an error be thrown when we try to access ‘self.setter(website)’ inside the ‘Crawl’ class, when setter() lives in ‘Tuxlabs’ ?

No, and the answer is because self, which refers to our ‘Crawl’ class, which is actually inheriting from our ‘Tuxlabs’ class. So this actually works ! Now from within ‘Crawl’ we can access all methods and attributes in Tuxlabs or Crawl, nifty, handy and powerful are the words that come to mind. Before moving on to some even cooler features, let’s show the abbreviated output of this script (I can’t show the entire webpage output, yuck!).

➜  tuxlabs  python example.py 
...
</body>
</html>
➜  tuxlabs

Nothing magical there, but I did want to show you that this code works !

Now then, we should talk about __init__ & super().

__init__() if you don’t already know is the initial method called in a class. It is what other languages might refer to as a constructor. When you create an instance object of a class the __init__() method within that class is called and whatever code is in it is executed. Init can be good for setting up default/static values used within the scope of the class and other methods. A typical example of an init class might look like this.

class Foundation(object):
    def __init__(self, sqlCreds):
        self.sqlHost = sqlCreds['host']
        self.sqlUser = sqlCreds['user']
        self.sqlPass = sqlCreds['pass']
        self.sqlDb = sqlCreds['db']
        if 'port' in sqlCreds:
            self.sqlPort = int(sqlCreds['port'])
        else:
            self.sqlPort = 3306
        self.sqlQuery = ''

Here we are defining a class ‘Foundation’ and an init constructor that accepts a dictionary as an argument containing SQL Credentials. Then within the init constructor we define several attributes who’s values are populated from that dictionary. We also made ‘port’ an optional argument with a default port of ‘3306’ the MySQL default port. This is a very useful start to a class, and it is my actual code from a project. From here we would build on top of this class many other methods like SQL queries we frequently used and other data processing techniques we frequently need like parsing JSON or XML.

Now let’s assume for a moment, this is a larger scale project. One that requires many classes. Classes that are inheriting from each other. Because the ‘Foundation’ class above is so generic, it can be used over and over again in other classes. However, those other classes will have slightly different purposes. In the case of databases, perhaps each class represents a different database. This makes sense, but we would still want to make use of the lovely constructor code inside of ‘Foundation’, thanks to it’s well written generic-ness. Here is an example of how we would do that, using something called super().

class Foundation(object):
    def __init__(self, sqlCreds):
        self.sqlHost = sqlCreds['host']
        self.sqlUser = sqlCreds['user']
        self.sqlPass = sqlCreds['pass']
        self.sqlDb = sqlCreds['db']
        if 'port' in sqlCreds:
            self.sqlPort = int(sqlCreds['port'])
        else:
            self.sqlPort = 3306
        self.sqlQuery = ''
...

class Cloud(Foundation):
    def __init__(self, sqlCredsCloud):
        super(Cloud, self).__init__(sqlCredsCloud)

...

We have our original class ‘Foundation’, and a new child class ‘Cloud’ that inherits ‘Foundation’. In addition ‘Cloud’ is defining it’s own __init__ constructor and accepting a dictionary for SQL credentials ‘sqlCredsCloud’. Finally, we call super() and pass our ‘Cloud’ class to the inherited class ‘Foundation’  (in this case self) and pass our SQL Creds to the ‘Foundation’ class constructor.

Whew.. I think I did an ok job explaining that, but you may need to read it back a couple of times and re-visit after trying to use this concept. Let’s take a look at how we would use these classes.

import sys
sys.path.append('/Users/jriedel/PycharmProjects')
from mymodules import foundation

def setup_cloud_db(sqlCredsCloud):
    Cloud = foundation.Cloud(sqlCredsCloud)
    CloudCursor = Cloud.SqlConnect()

    return (CloudCursor, Cloud)

if __name__ == '__main__':
    sqlCredsCloud = {'host': 'localhost', 'user': 'root', 'pass': '', 'db': 'cloud'}
    (CloudCursor, Cloud) = setup_cloud_db(sqlCredsCloud)
    Cloud.TruncateTable('cloud_machine_counts')

First we modify our Python path to locate the foundation module and import it. Then we create a subroutine for setting up our connection to the database and creating our instance object of our Cloud class. Notice we are passing sqlCredsCloud to the Cloud class and remember internally this is passing sqlCreds to the Foundation class constructor.  Finally, in the main routine of the program, after we setup the credentials and after we setup our database connection, we call ‘TruncateTable’, which is a method within the Cloud class that I have not shown in our code above, but you get the idea. Well I think that is about all I can muster, you now know what I know about inheritance.

For more information on super() click here

See ya next time !
Jason Riedel

Object-Oriented Programming With Python : Inheritance (2/3) Read More »

Introducing Vault

Vault

Vault is a command line utility for encrypting & decrypting things. Those things are stored on disk in hidden files, meaning in *nix they simply have a ‘.’ in front and don’t show up unless you type ls -la 😉 But anyway, who cares if someone can locate the files ! They are AES encrypted !

I wrote Vault for a couple of reasons.

  1. To learn how to use encryption in Python
  2. To store passwords for stuff
  3. To turn Vault into methods in my Utilities class that I use for my daily programming activities. First write a command line utility, then write a class 🙂

Vault Usage

I literally wrote vault earlier today and even though it is super simple, I still find it cool & useful so I had to share. Here’s a demo on it’s simple usage !

Keys

AES / Vault supports 16, 24, or 32 byte encryption keys. A byte is one character. Your key should be something ambiguous that you can remember and you should not use the ‘0123…’ example below. What would really be paranoid is to encrypt your keys in a separate vault somewhere 🙂 Note, you will need to use the same key to encrypt as decrypt for a given stored piece of encrypted data.

Encrypting

➜  vault git:(master) python store.py --name tuxlabs -t 'Well I could store a password or b00bs, cause everyone likes b00bs even the newbs' --key 01234567890987654321abcd
p/hvz1hf9RIyBeyMmgL2CILvlM20vU72E075K+32tysNU8dIJOcX/gVmRISYQTp0tHZ/W+qL2mCvMFrMP3rGAV2kCNNjGQNnbUSgPibPGiqfwMrQm3/EhH/f18dZofDGTwcMmHZ3LiERuIZt1toU0w== was stored as tuxlabs
➜  vault git:(master) ✗

Can You Read The File Contents ?

➜  vault git:(master) ✗ cat .tuxlabs 
p/hvz1hf9RIyBeyMmgL2CILvlM20vU72E075K+32tysNU8dIJOcX/gVmRISYQTp0tHZ/W+qL2mCvMFrMP3rGAV2kCNNjGQNnbUSgPibPGiqfwMrQm3/EhH/f18dZofDGTwcMmHZ3LiERuIZt1toU0w==%                                                                                                                     ➜  vault git:(master) ✗

Decrypting

➜  vault git:(master) ✗ python retrieve.py --name tuxlabs --key 01234567890987654321abcd
Well I could store a password or b00bs, cause everyone likes b00bs even the newbs
➜  vault git:(master) ✗

Alternatively, you can hide the key from the command line, by not specifying it. 

➜  vault  python store.py --name JimmyJohns --text 'Really Fast'
Key:
1HHF5TPl0cklDU/TXjMQ8nFeqK4zULQ50dVpJ+apgzQ= was stored as JimmyJohns
➜  vault  python retrieve.py --name JimmyJohns
Key:
Really Fast
➜  vault  cat .JimmyJohns 
1HHF5TPl0cklDU/TXjMQ8nFeqK4zULQ50dVpJ+apgzQ=%                                                                                                                                                                                                                                 ➜  vault

Clone Vault on github

Enjoy !
Jason Riedel

Introducing Vault Read More »